Creating Cinematic Videos with CapCut Desktop: Effects and Transitions Explained
Table of Contents
Introduction
With an intuitive user interface and various powerful features, CapCut has become quite popular among video editors worldwide. Following the tool’s international debut in April 2020, it has managed to gain significant market share. In that regard, TikTok’s user base and the different features, like the AI video generator, have also been playing a key role in boosting the growth of the video editing platform. Note that this versatile application is available on both Mac and PC.
If you are planning to create CapCut desktop cinematic videos but are not sure of how to navigate the process, you are in the right place. In this article, we will provide a step-by-step guide on how to use the tool to create engaging cinematic content. By the end of this article, you will have a practical understanding of how to apply basic edits and leverage the advanced features like the voice changer and text to speech.
How To Use CapCut Desktop Video Editor for Cinematic Videos?
In this section, let us look at the steps one can follow to create CapCut desktop cinematic videos. In addition, they can find some video editing tips that can help them create high-quality, immersive content.
Step #1 - Import and Organize Your Footage
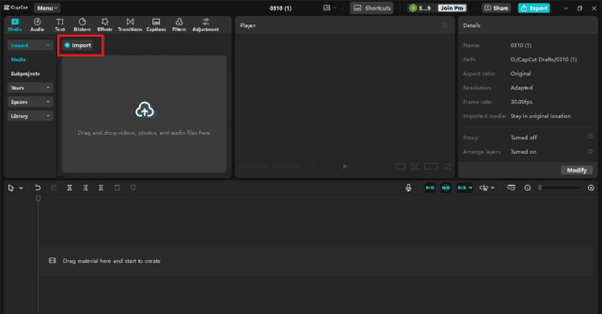
After starting a new project and customizing the settings by modifying resolution, project name, and aspect ratio, one must import footage. For importing and adding the main camera footage, one can click on the relevant option in the top corner, as shown in the image. Next, individuals have to drag and drop the clips on the timeline for editing.
Step #2 - Cut, Trim, and Set the Pace
If one wants only a part of a clip, they must trim it by making adjustments to the handles visible on the clip’s either side. They can click and drag the handles to adjust the start point and the end point of a clip and highlight the section they want. Alternatively, they can use the delete button if they wish to remove certain sections of any clip.
Also, if Individuals want to remove bad takes or mistakes, they can use the option that allows them to split clips at particular points. Instead of clicking on the button for splitting a clip, they can click on Ctrl B or Command B. Other available shortcuts for trimming sections of a clip include Q (delete left) and W (delete right). These shortcuts allow one to trim a clip’s portions fast and close unwanted gaps between two clips.
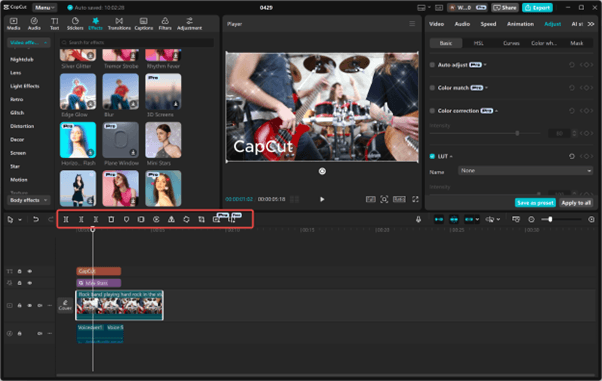
Step #3 - Use Color Grading for Cinematic Look
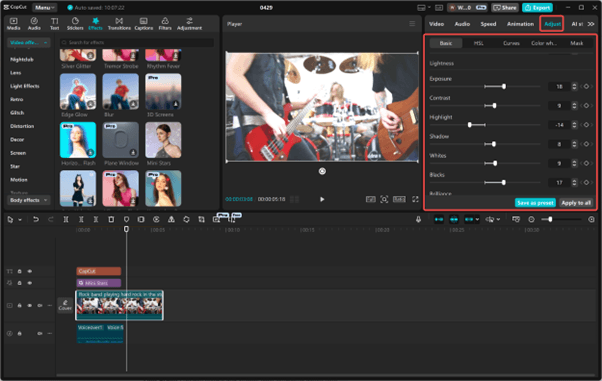
If you want to create cinematic content that is a masterpiece, color correction and color grading are crucial. After all, color expresses the video’s atmosphere, tone, and emotion. One can manually adjust saturation, temperature, brightness, contrast, shadow, etc., to meet the requirements. One can also customize advanced settings in the color wheel, curves, and HSL tabs.
Keep in mind that individuals can also choose to apply basic filters to get the desired look. CapCut provides users with an extensive range of filters to fulfill varying requirements. Also, for uniformity, one can click on ‘Apply to all’ to ensure that the color correction in different clips matches. After color grading, one can focus on CapCut effects and transitions.
Step #4 - Add Cinematic Effects
The next step involves adding different cinematic effects to create a high-quality, engaging video.
Let us look at the different CapCut effects one can utilize to achieve the desired result.
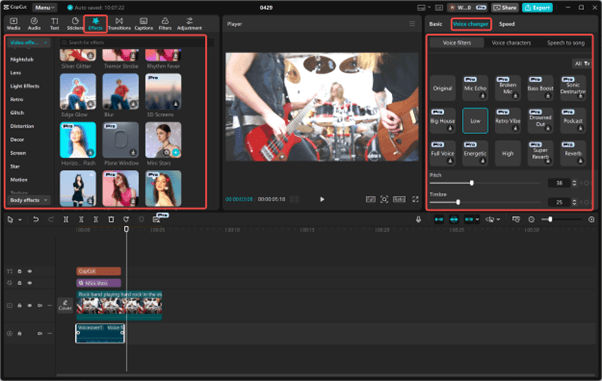
- Lens Flare: Among the popular video editing tips given by experts for CapCut, adding lens flare is quite popular. It can enhance the visual appeal and mood of a project. This effect can help one improve futuristic aesthetics and even replicate natural sunlight. Moreover, it can help in evoking drama, for example, by amplifying explosions and thus serve as an effective storytelling tool. One can add this effect when editing CapCut desktop cinematic videos ‘Effects’ tab, which one can find at the top of the screen.
- Film Grain: Film grain refers to the random patterns of speckles that one can find on a screen. One can use this effect when creating CapCut desktop cinematic videos to generate a believable or natural look and improve the aesthetics of the content. To add this effect, one can open the adjustment tab in the top right corner and adjust the particle effect slider according to their requirement.
- Motion Blur: The motion blur effect can help video editors make motion appear to be more natural. Precisely, it adds realism and improves the video’s visual style. One can add this effect to their content and enhance the overall quality by going to the effects tab and then selecting the desired motion blur effect from the video effects section. Note that after adding the effect, one can adjust the horizontal value and the blur strength in accordance with their requirement.
- Glow and Bloom: The glow effect can bring a soft, beautiful light to a screen, which can help create stunning visuals by adding warmth. On the other hand, the bloom effect can emphasize lighting and add depth, enhancing the visual appeal of the content. One can add the effects on CapCut from the effects tab. After adding the glow and bloom effect, one can adjust the settings to achieve the desired result.
Step #5 - Master Transitions for Seamless Storytelling
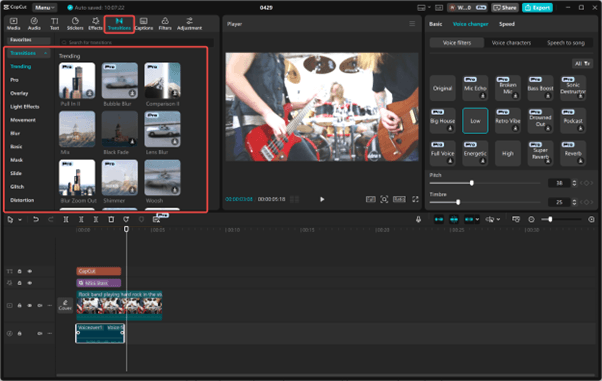
In the next step of the CapCut desktop cinematic video editing process, one needs to utilize transitions. This is a vital step as transitions help in moving a story along and convey a tone or mood to the content consumers, laying the groundwork for the next scene. Simply put, utilizing transitions is essential for creating cohesive content.
So, let us look at the popular transitions one can use on CapCut:
- Cross Dissolve or Fade to Black: A cross dissolve transition involves gently increasing one screen’s opacity over the preceding one. Simply put, it enables one screen to fade out while allowing the next screen to fade in. On the other hand, in the case of the fade to black transition, a video clip slowly transitions out of or into a black screen. One can add these transitions from the ‘Transitions’ tab available in the top left toolbar.
- Zoom or Push: The zoom transition allows editors to reduce or augment video frames between a couple of clips. That said, a push transition involves sliding or pushing a clip out of a video frame and sliding the succeeding clip into the video frame. One can add these transitions according to their requirement from the transitions tab.
- Match Cut Transitions: A match cut transition utilizes components, like shapes, colors, etc., from the preceding clip to smoothly bring viewers through to the succeeding clip. It helps create a seamless and cohesive narrative. Like other transitions, one can find it in the transitions tab.
After adding all the CapCut effects and transitions, one can export the video from the relevant option in the screen’s top right corner. Individuals can select specific bitrate, resolution, and file format on the basis of their preferences.
Final Thoughts
As one can get an idea from the above features and associated screenshots, this video editing platform is a highly advanced tool that can help one create cinematic videos easily. Hopefully, the step-by-step guide has managed to explain how you can make the most of the different tools available to create CapCut desktop cinematic videos without any hassle.
