Excel VBA FileCopy Function
FileCopy is a built-in VBA function used to copy the file from one location to another mentioned location. To use this function, we need to mention the current file path and destination file path.
Let us look at the syntax of the FileCopy function.

Key Takeaways
- Source: This is nothing but from where we need to copy the file. We need to mention the fully qualified folder path.
- Destination: This is the destination folder where we must paste the copied file.
Examples
Below are examples of how to copy files using VBA Code.
Example #1
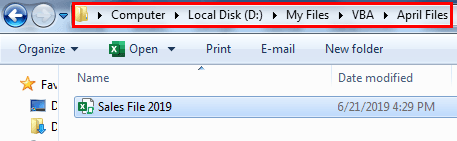
Let us start with a simple example. We have a file named “Sales April 2019” in the folder. Below is the image of the same “Source.”
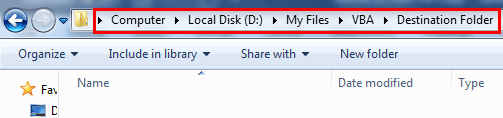
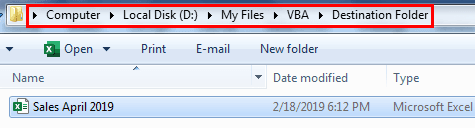
We want to copy and paste this file to a different folder from the above location. Below is the image of the same, “Destination Source.”
Let us write the code for it.
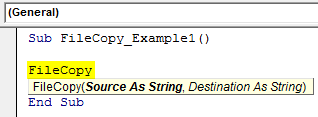
Open the FileCopy function inside the Sub procedure.
Code:
Sub FileCopy_Example1()
FileCopy
End Sub
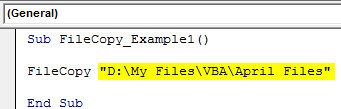
For the first argument, we need to mention the file path where our currency is in.
Code:
Sub FileCopy_Example1()
FileCopy “D:My FilesVBAApril Files
End Sub
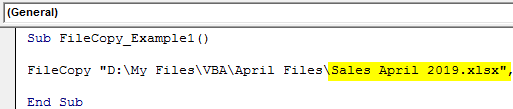
After mentioning the folder path, we need to mention the file with a file extension. So, mention the file name by putting a backslash ().
Code:
Sub FileCopy_Example1()
FileCopy “D:My FilesVBAApril FilesSales April 2019.xlsx”,
End Sub
The second argument mentions where we need to paste the copied file.
Code:
Sub FileCopy_Example1()
FileCopy “D:My FilesVBAApril FilesSales April 2019.xlsx”, “D:My FilesVBADestination FolderSales April 2019.xlsx”
End Sub

One thing we need to do hereafter mentioning the folder path at the end is mention the file name in the destination argument.
Now, run the code using the F5 key or manually. Then, it will copy the file from the below location to a destination location.
“D:My FilesVBAApril FilesSales April 2019.xlsx”
“D:My FilesVBADestination FolderSales April 2019.xlsx”
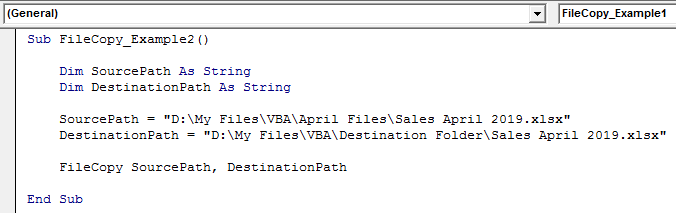
Example #2 – Use Variables to Store Source Path and Destination Path.
In the previous example, we supplied the source and destination paths directly to the formula. But this is not the best practice to continue, so let’s store them in variables.
For example, look at the below code.
Code:
Sub FileCopy_Example2()
Dim SourcePath As String
Dim DestinationPath As String
SourcePath = “D:My FilesVBAApril FilesSales April 2019.xlsx”
DestinationPath = “D:My FilesVBADestination FolderSales April 2019.xlsx”
FileCopy SourcePath, DestinationPath
End Sub
Let me explain the code in detail for you.
First, we have declared two variables.
Dim SourcePath As String
Dim DestinationPath As String
Then, for the first variable, we have assigned the folder path from where it has to copy the file and its name along with its extension.
SourcePath = “D:My FilesVBAApril FilesSales April 2019.xlsx”
Similarly, we have assigned the destination folder path with the file name and excel extension.
DestinationPath = “D:My FilesVBADestination FolderSales April 2019.xlsx”
Then for the formula FileCopy, we have supplied these variables instead of lengthy folder path strings.
FileCopy SourcePath, DestinationPath
Like this, we can use variables to store the paths and use them efficiently.
Example #3 – Error with File Copy Function
Sometimes the FileCopy function encounters an error of “Permission denied.”
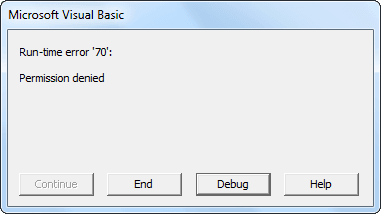
We get this error when the copying file is open. Therefore, always close the file and execute the code if you try to copy the above error.
Recommended Articles
This article has been a guide to VBA FileCopy. Here, we discuss copying Excel files from one directory to another using the FileCopy function and examples. Below you can find some useful Excel VBA articles: –