Table Of Contents
How To Enable Macros in Excel (2007, 2010, 2013, and 2016)?
VBA codes are very helpful in automating complex tasks which should be run manually. However, they can pose significant risks from a security point of view. There are macros which can delete your files, damage the hard drive and corrupt your data. Hence, it is important that one enables only safe macros that have been written or recorded yourself or are from trusted sources. Hence, Excel's default setting is that it disables all macros and provides a notification. One should exercise caution before they decide to enable macros in Excel.
At the foremost, the user should decide the extent of permission to be given while enabling macros. The consent can be partial, complete or zero (no permission).
Once decided on the extent of permission, follow the steps listed below to enable Excel macros:
Step 1: In the File tab, click “Options.”

Step 2: In the “Excel Options” dialog box, click “Trust Center Settings” in the “Trust Center” option.

- Step 3: How to change macro settings in Excel
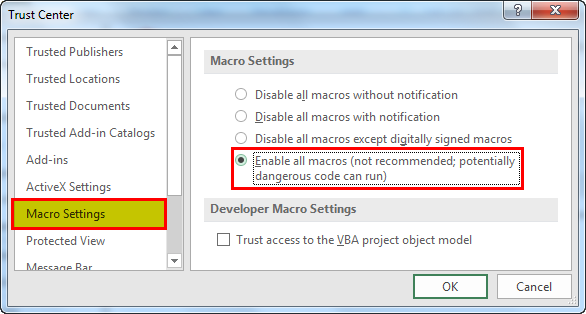
From the “Macro Settings,” select the extent of permission to be granted. Depending on the requirement, the user can choose one of the following options (shown in the succeeding image):
• “Disable all macros without notification” does not send any notifications regarding the disabled macros.
• “Disable all macros with notification” sends notifications stating that macros of the current file are disabled.
• “Disable all macros except digitally signed macros” stops the usage of all macros except the digitally signed ones.
• “Enable all macros” gives full permission to run all macros.
Click “Ok” to apply the selected macro settings.
Note: The option “enable all macros” is selected only if the source is trusted.
- Step 4: In the “ActiveX settings” option (under “Trust Center Settings”), select “enable all controls without restrictions and without prompting.”
The ActiveX controls are activated to enable macros properly. These controls are necessary for the object of macros.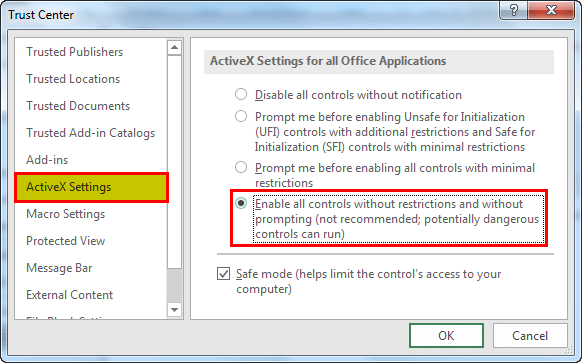
Key Takeaways
- Macros in Excel are written in VBA to perform repetitive tasks quickly.
- Excel disables macros by default to protect against harmful code like viruses.
- To enable macros, go to File → Options → Trust Center → Trust Center Settings → Macro Settings.
- Now, choose: "Enable all macros" or "Disable all macros with notification" (recommended for safety).
How To Enable all Macro Files in Excel Permanently?
If a file received from a trusted source contains macros or VBA content, the macros need to be enabled if we have to use the file. In such cases, the macros are enabled permanently to save time.
The steps to enable macros in Excel permanently are listed as follows:
Step 1: In the File tab, click “Options.”
Step 2: In the “Excel options” dialog box, click “Trust Center Settings” in the “Trust Center” option.
Step 3: In the “macro settings” option, select “enable all macros.” Click “Ok” to apply the selected macro settings.
Now, you have permanently enabled macros in Excel.
The Cautions While Enabling Macros
The following points must be remembered while enabling macros:
- The file containing VBA code must be saved as “macro-enabled workbook.” Saving the file with some other extension does not save the VBA code and thus, does not enable the macros.
- The option “enable all macros” runs all macros without any further warning or consent. Since the macros of both trusted and non-trusted sources are enabled, it might become dangerous.
- The option “disable all macros without any notification” does not inform the reason behind why macros are not running. Hence, select “disable all macros with notification” to view the warnings.
Interested in learning more on Macros? You can check out our Basic Excel VBA Macro Crash Course for Beginners which will be very helpful in sharpening your skills.