Borders in VBA Excel
We use borders in Excel to highlight our data. In any dashboard, it is a very important skill to represent the important data, and borders do it. Borders are a property in VBA that we can access using the Range method and giving the appropriate border style as we know there are different border styles.
If you are good at formatting in excel, you can call yourself an “Excel Beautician.” Formatting is vital in making the reports look appealing to the end-user or readers. We hope you are well aware of the formatting techniques in the regular worksheet. Formatting through VBA coding requires a considerable amount of VBA coding language. This article will show you one of the most underrated formatting techniques, i.e., applying Excel VBA borders.
Examples of Borders in VBA
Let us take a look at some examples to understand this in a better manner.
Example #1 – Apply VBA Borders with Coding
Creating a macro to apply Excel VBA borders with different styles, making them available as an add-on to the excel ribbon, makes the job easier whenever we want to apply VBA borders.
Every cell in a worksheet has borders and background colors. By default, every cell has no border and background color.
In the worksheet under the HOME tab, we have a border option. In addition, we have various options if you click on the drop-down list in excel.

But in VBA, first, we must decide on the cell or range of cells. Then, we will apply the Excel VBA borders formatting styles. So, we can refer to the range of cells or cells using VBA RANGE object. So, for example, if you want to change the border of cell B5, then you can write the code like this.
Range(“B5”)
Then, we need to access the “Borders” property.
Code:
Sub Border_Example1()

  Range("B5").Bo

End Sub
After applying the Excel VBA “Borders” property, we must open parenthesis to see all border formatting options..
Code:
Sub Border_Example1()

  Range("B5").Borders(

End Sub
Here, we have xlDiagonalDown, xlDiagonalUp, xlEdgeBottom, xlEdgeLeft, xlEdgeRight, xlEdgeTop, xlInsideHorizontal, and xlInsideVertical.

After selecting the border style, we need to select the characteristic we want to work with. One of the characters we need to use here is “LineStyle,” so select the “LineStyle” property.
Code:
Sub Border_Example1()

  Range("B5").Borders (xlEdgeBottom).li

End Sub
Once the line style property is selected, we need to set the line style type of line or type of borders we will apply in VBA.
Put an equal sign and select “XlLineStyle” enumeration.
Code:
Sub Border_Example1()

  Range("B5").Borders(xlEdgeBottom).LineStyle =XlLineStyle.

End Sub
Put a dot to see all the available border styles.
Code:

We have many options here. xlContinuous, xldash, xlDashDot, xlDashDotDot, xlDot, xlDouble, XlLineStyleNone, and xlSlantDashDot.
Now, we have selected the option of “xlDouble.”
Code:
Sub Border_Example1()
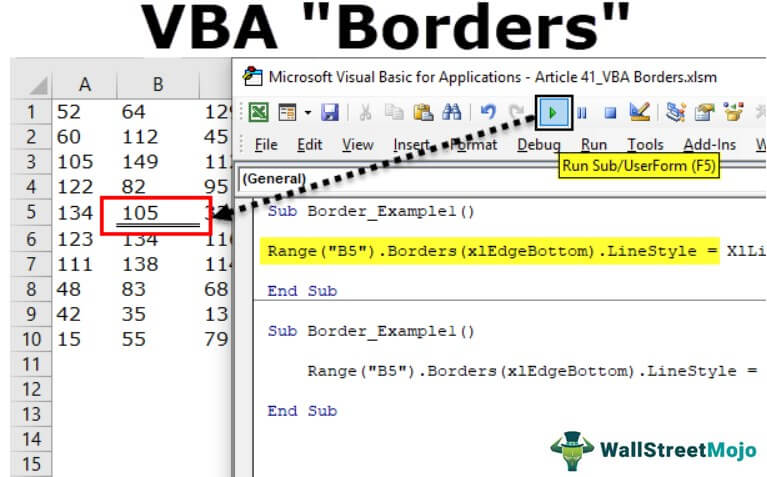
Range("B5").Borders(xlEdgeBottom).LineStyle = XlLineStyle.xlDouble
End SubNow, if I run the code, it will apply the Double line to the bottom of cell B5.

Line Type: “xlContinuous”.
Code:
Sub Border_Example1()

  Range("B5").Borders(xlEdgeBottom).LineStyle = XlLineStyle.xlContinuous

End Sub
Result:

Line Type: “clash.”
Code:
Sub Border_Example1()

  Range("B5").Borders(xlEdgeBottom).LineStyle = XlLineStyle.xlDash

End Sub
Result:

Line Type: “xlDashDot.”
Code:
Sub Border_Example1()

  Range("B5").Borders(xlEdgeBottom).LineStyle = XlLineStyle.xlDashDot

End Sub
Result:

Line Type: “xlDashDotDot”.
Code:
Sub Border_Example1()

  Range("B5").Borders(xlEdgeBottom).LineStyle = XlLineStyle.xlDashDotDot

End Sub
Result:

Line Type: “xlDot.”
Code:
Sub Border_Example1()

  Range("B5").Borders(xlEdgeBottom).LineStyle = XlLineStyle.xlDot

End Sub
Result:

Line Type: “xlLineStyleNone”.
Code:
Sub Border_Example1()

  Range("B5").Borders(xlEdgeBottom).LineStyle = XlLineStyle.xlLineStyleNone

End Sub
Result:

It will remove the border of the specified cell.
Line Type: “xlSlantDashDot”.
Code:
Sub Border_Example1()

  Range("B5").Borders(xlEdgeBottom).LineStyle = XlLineStyle.xlSlantDashDot

End Sub
Result:

Example #2 – Change the Border Using VBA Borders Around Method
We can also change the cell’s borders using the VBA Borders Around method. Once we mention the range of cells or cells, we need to access the VBA Borders Around method.

Open parenthesis to see all the parameters.
Range(“B5”).BorderAround([Line Style], [Weight as xlBorderWeight], [ColorIndex], [Color], [Theme Color])
We can mention the line style, color, border weight, and many more things we can do with this method.
Code:
Sub Border_Example1()

  Range("B5").BorderAround LineStyle:=xlContinuous, Weight:=xlThick

End Sub
It will change the Line Style to xlContinuous.
LineStyle:=xlContinuous
The weight of the Border is thick.
Weight:=xlThick
And the result of this code is as below.

Like this, using Excel VBA Borders and Border Around property and method, we can change the border and elements of borders through VBA coding.
Recommended Articles
This article has been a guide to VBA Borders. Here, we learn how to set borders with Excel VBA coding, practical examples, and downloadable code templates. You may also have a look at other articles related to Excel VBA: –