Excel VBA TextBox
A TextBox is simply a box used to get input from a user. Text boxes are a part of UserForms. For example, in the Developer tab in any Excel worksheet, if we want to make text boxes in a UserForm, we can select the textbox option from user form controls in VBA, or in the worksheet, we can select it from the Design tab.
VBA TextBox is one of the many controls of the UserForm. By displaying the text box on the UserForm, we can ask them to enter the data into the text box. Furthermore, it can store the data entered by the user on the worksheet with simple codes.
Userforms are very attractive in VBA coding. It helps us immensely, especially when we need input from the users. With UserForms, we have many controls. For example, to get the input value from the users, “Text Box” is the ideal option in a UserForm. By putting a text box on the UserForm, we can tell the user to enter the required value in the text box we display. If you have no idea about VBA text boxes, this article will take a tour of VBA text boxes.
How to Insert TextBox in VBA UserForm?
To insert a text box first, we need to insert a UserForm. To insert the UserForm, go to Insert > UserForm.

As soon as you click on UserForm, we will use UserForm just like another module.

Click on UserForm to see the controls of the UserForm.

From this “Controls” toolbox, select “TextBox” and drag on the UserForm.

With this, we can see many properties associated with this text box.
TextBox Properties
Press the F4 key to see the properties of the TextBox.

As we can see, the text box has a name, color, and border like this many. Now, give a proper name to refer to this text box while coding easily.
Example of using TextBox in Userform
We will conduct one of the projects with VBA text. We will create a data entry user form to store the details of the employees.
Step 1: On the UserForm, draw the label.

Step 2: Change the default text of the label to “Employee Name.”

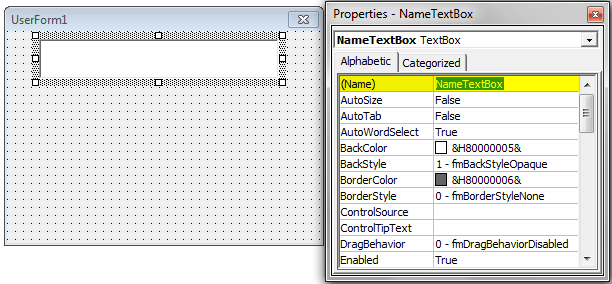
Step 3: In front of the label, draw a text box.

Step 4: Give a proper name to the text box as “EmpNameTextBox.”

Step 5: Draw one more label below the first label and enter the text as “Employee ID.”

Step 6: In front of the second label, draw one more text box and name it “EmpIDTextBox.”

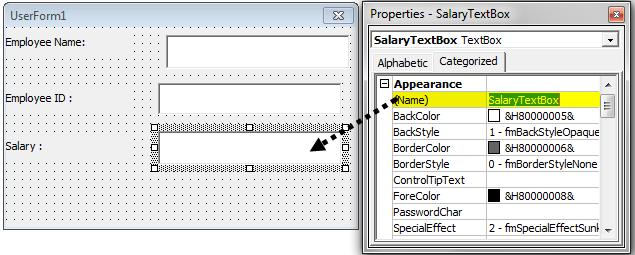
Step 7: Draw one more label and enter the text as “Salary.”

Step 8: Draw one more text box in front of the “Salary” label and name it “SalaryTextBox.”
Step 9: Insert the “Command Button” from the ToolBox.

Step 10: Change the text of the command button to “Submit.”

We have completed the UserForm design part. Next, we need to write the code to store the data entered in this UserForm. As of now, run the UserForm by pressing the F5 key. We should see a UserForm like this.

Step 11: Change the caption of the UserForm in the “Properties” window.

Step 12: Now, double-click on the “Submit” command button. As soon as you double-click, you will see this auto-sub procedure like the one below.

What should happen when you click on the “Submit” button? First, we need to mention the tasks in the VBA code. In this project, we aim to store the data entered in the text box as soon as we click the “Submit” button.
For this, first, create a template like this in the worksheet named “Employees Sheet.”

Step 13: Now, come back to the Visual Basic Editor. Inside the button, click subroutine in VBA first to determine the last used row by using the below code.
Code:
Private Sub CommandButton1_Click()

   Dim LR As Long

   LR = Worksheets("Employee Sheet").cell(Rows.Count, 1).End(xlUp).Row + 1

End Sub
Step 14: First, we will store “Employee Name” in the first column. So for this, we need to access the text box named “EmpNameTextBox.”
Code:
Private Sub CommandButton1_Click()

   Dim LR As Long

   LR = Worksheets("Employee Sheet").cell(Rows.Count, 1).End(xlUp).Row + 1

   Ramge("A" & LR).Value = EmpNameTextBox.Value

End Sub
Step 15: We need to store the “Employee ID” in the second column. So, we may obtain this by accessing the text box “EmpIDTextBox.”
Code:
Private Sub CommandButton1_Click()

   Dim LR As Long

   LR = Worksheets("Employee Sheet").cell(Rows.Count, 1).End(xlUp).Row + 1

   Ramge("A" & LR).Value = EmpNameTextBox.Value

   Ramge("B" & LR).Value = EmpIDTextBox.Value

End Sub
Step 16: At last, we need to store the salary part. For this, we need to access a text box named “SalaryTextBox.”
Code:
Private Sub CommandButton1_Click()
Dim LR As Long
LR = Worksheets("Employee Sheet").cell(Rows.Count, 1).End(xlUp).Row + 1
Ramge("A" & LR).Value = EmpNameTextBox.Value
Ramge("B" & LR).Value = EmpIDTextBox.Value
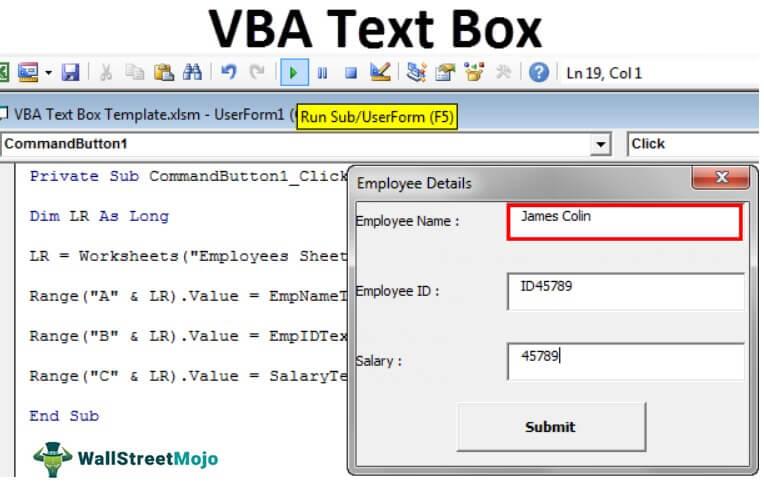
Range("C" & LR).Value = SalaryTextBox.Value
End Sub
We have completed the coding part as well. Now, run the code using the F5 key. We should see a UserForm like the one below.
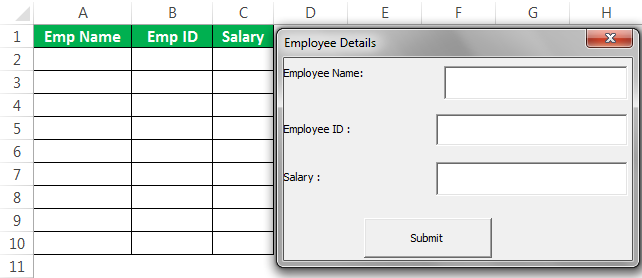
As of now, all the boxes are empty.
Fill in the details first.

Now, click on the “Submit” button. It will store the data on the worksheet.

Like this, you can keep entering the data and press the “Submit” button. It is a simple data entry UserForm with a text box.
Recommended Articles
This article has been a guide to VBA TextBox. Here, we learn how to insert and use textbox control in UserForm through Excel VBA, practical examples, and a downloadable template. Below you can find some useful Excel VBA articles: –