Excel VBA Protecting Sheet
We can protect the Excel sheet using VBA code which does not allow the user to make any changes to the worksheet data. All they can do is just read the report. For this, we have a built-in VBA method called “Protect.”
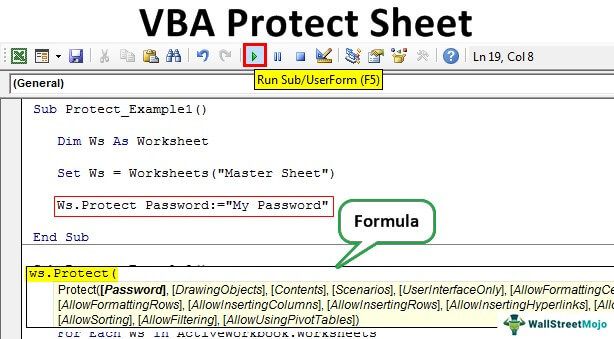
Like we protect our worksheets in Excel; similarly, we can use VBA to protect our worksheets. There are two methods to protect the sheet using a .protect statement. One is with a password, and another is without a password. The syntax to protect a worksheet is as follows Worksheets().Protect Password.
We usually share the end report with the user or reader. When we share the end report with the user, we wish the user would not make any modifications or manipulate the end report. It is all about trust in such a scenario.
Syntax
The protecting sheet involves various parameters to supply. It is unlike Unprotecting the sheet. Let us look at the syntax of the Protect method with a password.

Don’t get intimidated by looking at the syntax. Instead, have a look at the explanation of each argument below.
- Worksheet Name: First, we must mention which worksheet we will protect.
- Password: We need to enter the password we are using to protect. If we ignore this parameter, Excel will lock the sheet without a password. While unprotecting it, it will unprotect without asking for any password.
- Note: Remember the password you are giving, because if you forget, you must go through various hard ways. A password manager can be handy in this case.
- Drawing Object: If you wish to protect objects in the worksheet, you can pass the argument as TRUE or else FALSE. The default value is TRUE.
- Contents: To protect the contents of the worksheet, set the parameter as TRUE or else FALSE. The default value is FALSE. So, it will protect only locked cells. And the default value is TRUE.
- Scenarios: If there are any what-if analysis in excel scenarios, we can also protect them. To protect TRUE or else FALSE. The default value is TRUE.
- User Interface Only: If you want to protect the user interface other than Macro, it should be TRUE. If this argument is omitted, it will protect Macros and the user interface. If you set the argument to TRUE, it will only protect the user interface. The default value is FALSE.
- Allow Formatting Cells: If you want to allow the user to format the cell, then you can set the parameter to TRUE or else FALSE. The default value is FALSE.
- Allow Formatting Columns: If you want to allow the user to format any column in the protected sheet, then you can set the parameter to TRUE or else FALSE. The default value is FALSE.
- Allow Formatting Rows: If you want to allow the user to format any row in the protected sheet, then you can set the parameter to TRUE or else FALSE. The default value is FALSE.
- Allow Insert Columns in VBA: If you wish to allow the user to insert new columns, then you need to set this to TRUE. The default value is FALSE.
- Allow Insert Rows: If you wish to allow the user to insert new rows, you must set this to TRUE. The default value is FALSE.
- Allow Insert Hyperlinks: If you wish to allow the user to insert hyperlinks, then you need to set this to TRUE. The default value is FALSE.
- Allow Deleting Columns: If you wish to allow the user to delete columns in VBA, then you need to set this to TRUE. The default value is FALSE.
- Allow Deleting Rows: If you wish to allow the user to delete rows, you need to set this to TRUE. The default value is FALSE.
- Allow Sorting: If you wish to allow the user to sort the data, you need to set this to TRUE. The default value is FALSE.
- Allow Filtering: If you wish to allow the user to filter the data, then you need to set this to TRUE. The default value is FALSE.
- Allow Using Pivot Tables: If you wish to allow the user to use pivot tables, then you need to set this to TRUE. The default value is FALSE.
How to Protect Sheet using VBA Code?
Step 1: Select the Sheet which needs to be protected
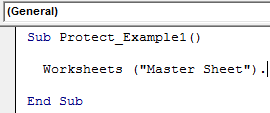
The first step is to decide which sheet we need to protect using a password to protect the sheet. Next, we need to call the sheet by name using the VBA Worksheet Object.
For example, assume you want to protect the “Master Sheet” sheet, then you need to mention the worksheet name below.
Step 2: Define Worksheet Variable
After mentioning the worksheet name, put a dot, but we don’t see any IntelliSense list to work with. So, it makes the job difficult. To access the IntelliSense list, define the variable as a worksheet.
Code:
Sub Protect_Example1()

  Dim Ws As Worksheet

End Sub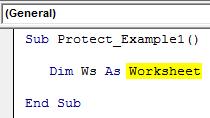
Step 3: Give Worksheet Reference
Now, set the worksheet reference to the variable as Worksheets(“Master Sheet”).
Code:
Sub Protect_Example1()

   Dim Ws As Worksheet

   Set Ws = Worksheets("Master Sheet")

End Sub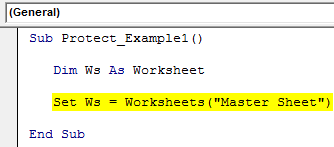
Now, the variable “Ws” holds the reference of the worksheet named “Master Sheet.” By using this variable, we can access the IntelliSense list.

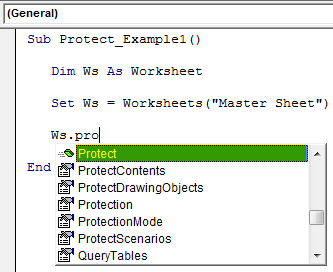
Step 4: Select Protect Method
Select the “Protect” method from the IntelliSense list.
Step 5: Enter Password
Specify the password in double-quotes.
Code:
Sub Protect_Example1()

   Dim Ws As Worksheet

   Set Ws = Worksheets("Master Sheet")

   Ws.Protect Password:="MyPassword"

End Sub
Step 6: Run the Code
Run the code manually or use the shortcut key F5. Then, it will protect the sheet named “Master Sheet.”
When the sheet is protected, if we want to modify it, it shows an error message, as shown below.

We need to use loops if you wish to protect more than one sheet. Below is the example code to protect the sheet.
Sub Protect_Example2()

  Dim Ws As Worksheet

  For Each Ws In ActiveWorkbook.Worksheets
  Ws.Protect Password:="My Passw0rd"
  Next Ws

End Sub
Note: Use other parameters to experiment.
Recommended Articles
This article is a guide to VBA Protect Sheets. Here, we learn how to use Protect methods in VBA to protect or lock an Excel sheet using a password, along with a practical example and a downloadable template. Below you can find some useful Excel VBA articles: –