Table Of Contents
What Is Import Data In Excel?
Import data in Excel is a method to import other files into our Excel worksheet. Importing the data from another file or another source file is often required in Excel.
For example, consider the below text document showing marks obtained by Andy in various subjects.

Now, let us learn how to import the data from this text file into Excel worksheet.
The steps are:
Step 1: First, select Data - From Text/CSV option from the Get & Transform Data group.
Step 2: Next, select the text file from the computer.
The Import Data window opens up. Select the Delimiter option. In this example, let us select colon.
Step 3: Next, click on Transform Data and we can see our data imported readily into columns as shown in the below image.

Likewise, we can import data into Excel.
Key Takeaways
- Import data into Excel is a method used to import various files into Excel worksheet.
- If there are many tables, we must specify which table data we need to import.
- If we want the data in the current worksheet, we need to select the desired cell. Else, if we need data in a new worksheet, we must choose the new worksheet as the option.
- We need to separate the column in the TEXT file by identifying the common column separators.
How To Import Data In Excel?
Sometimes people need data directly from very complicated servers, and sometimes we may need to import data from a text file or even from an Excel workbook.
Let us learn how to import data in Excel with the following examples.
#1 – Import Data From Another Excel Workbook
Let us start.
- First, we must go to the DATA tab. Then, under the DATA tab, click on Connections.

- As soon as we click on Connections, we may see the below window separately.

- Now, click on Add.

- It will open up a new window. In the below window, select All Connections.

- If there are any connections in this workbook, it will show what those connections are here.

- Since we are connecting to a new workbook, click on Browse for more.

- In the below window, browse the file location. Then, click on Open.

- After clicking on Open, it shows the below window.

- Here, we need to select the required table to be imported to this workbook. Select the table and click on OK.

After clicking on OK, close the Workbook Connection window. - Then, go to Existing Connections under the DATA tab.

- Here, we will see all the existing connections. Select the connection we have just made and click on Open.

- Once we click on Open, it will ask us where to import the data. First, we need to select the cell reference here. Then, click on the OK button.

- It will import the data from the selected or connected workbook.

Like this, we can connect to the other workbook and import the data.
#2 – Import Data From MS Access To Excel
MS Access is the main platform to store the data safely. We can import the data directly from the MS Access File itself whenever the data is required.
Step 1: Go to the “DATA” ribbon in excel and select “From Access.

Step 2: Now, it will ask us to locate the desired file. Select the desired file path. Then, click on “Open.”
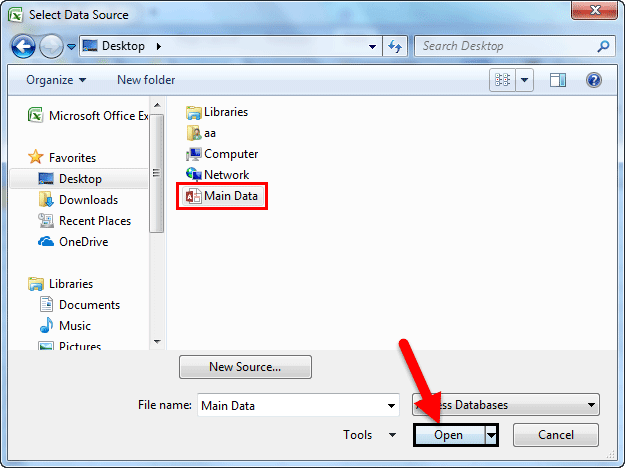
Step 3: Now, it will ask us to select the desired destination cell where we want to import the data. Then, click on “OK.”
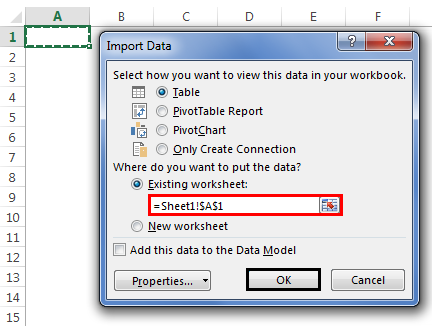
Step 4: It will import the data from access to the A1 cell in Excel.
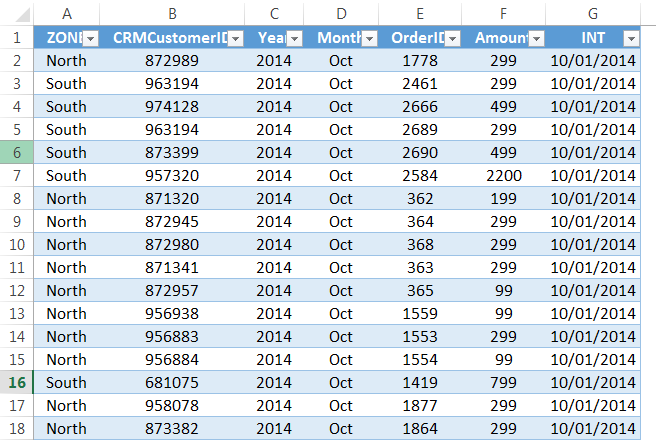
#3 – Import Data From Text File To Excel
In almost all the corporations, whenever we ask for the data from the IT team, they will write a query and get the file in TEXT format. But unfortunately, TEXT file data is not the ready format to use in Excel; we need to make some modifications to work on it.
Step 1: Go to the “DATA” tab and click on “From Text.”

Step 2: Now, it will ask us to choose the file location on the computer or laptop. Select the targeted file, then click on “Import.”
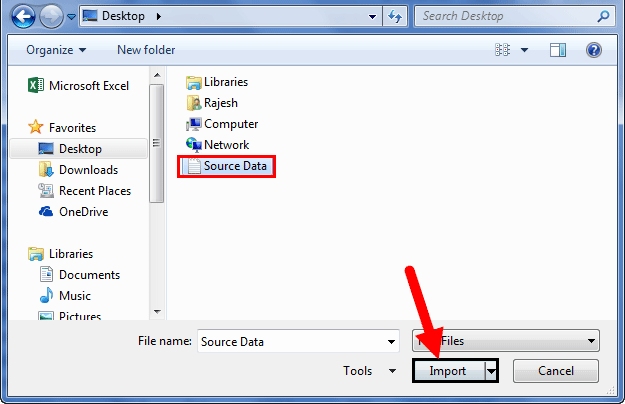
Step 3: It will open up a “Text Import Wizard.”
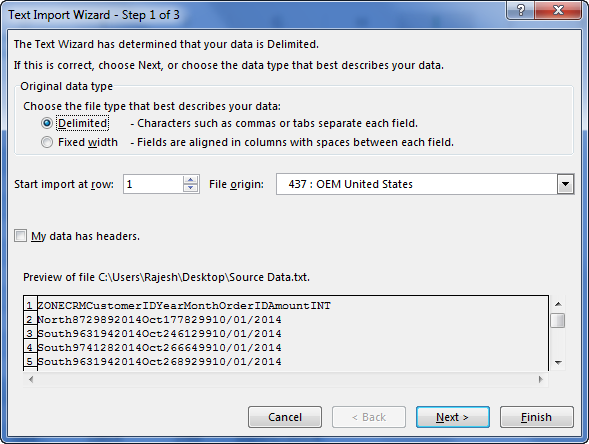
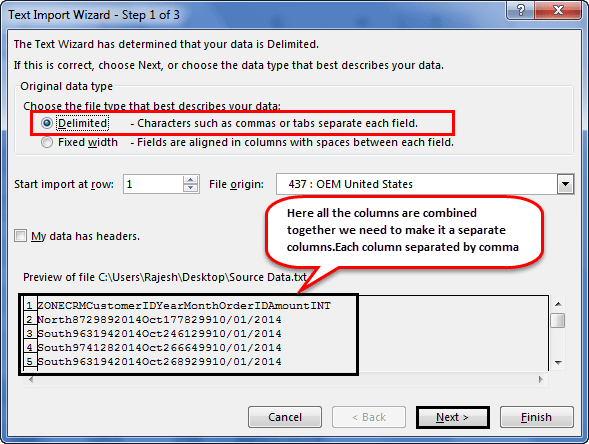
Step 4: By selecting the “Delimited,” click on “Next.”
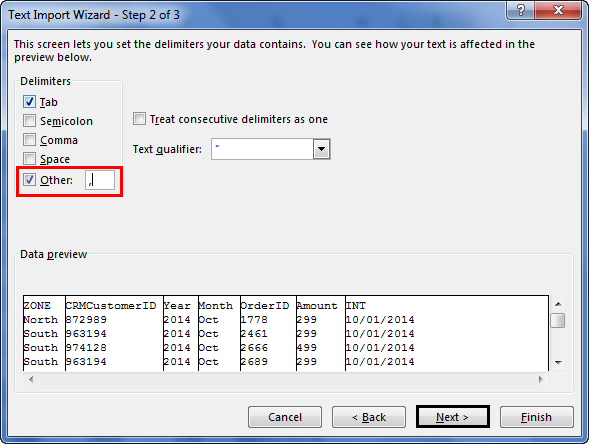
Step 5: In the next window, select the other and mention comma (,) because, in the text file, each column is separated by a comma (,). Then click on “Next.”
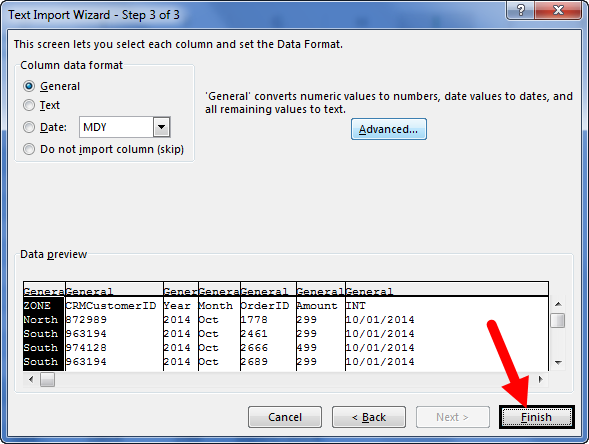
Step 6: In the next window, click on "Finish."
Step 7: Now, it will ask us to select the desired destination cell where we want to import the data. Select the cell and click on “OK.”
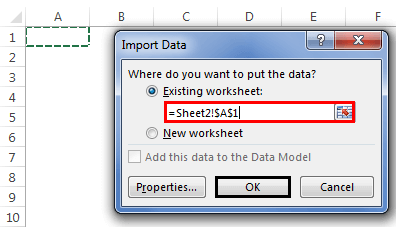
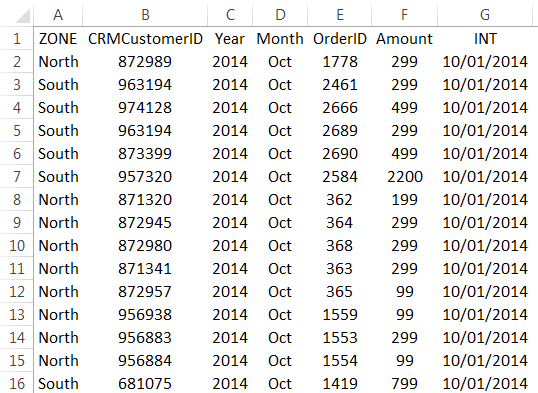
Step 8: It will import the data from the text file to the A1 cell in Excel.
Important Things To Note
- Import Data into Excel, as the name suggests is used to import data into our Excel worksheet.
- Remember to choose a specific table while dealing with multiple tables in data.
- Check the preview of the table and click on Keep option to save the changes.

