Excel VBA XLUP
One thing you need to remember while writing VBA code is what you do with the regular worksheet. You can replicate the same thing in VBA as well. One such keyword in VBA coding is “XLUP” in this article. First, we will show you what this keyword is in VBA coding and how to use it in coding.
How to Use VBA XLUP in Coding?
The following are examples of Excel VBA XLUP.
Example #1 – Move Cells to Deleted Position of Cells
Look at the scenario of the below data, where you need to delete those colored cells data and move up the below rows data to the above data.

One way of deleting this in the worksheet is to select those cells in which we can delete the entire row. But here, situations are a little tricky because we have colored cells in Table 1 when we delete the entire row. Even Table 2 rows get deleted, but we don’t want this to happen. So instead, we only need to delete colored rows, and the below cells should move up the position of the deleted cells.
First, select the colored cells and press Ctrl + Minus Symbol (-) to open the “Delete” option.
Shortcut Key to Open “Delete” Option
In the “Delete” options window, we have four options. We can choose the action as per our requirement. Since we need to move our cells up for those deleted cells’ position, choose “Shift cells up.”

We’ll have unchanged Table 2 rows.

This action in VBA requires using the XLUP property to perform similar actions in VBA. Now, come to the window of the VBA editor and start your macro name.
Code:
Sub XLUP_Example()
End Sub
First, supply the cell RANGE to be included in this operation. In this action, the first cells to be deleted and moved up are “A5: B5” cells.
Code:
Sub XLUP_Example()
Range (“A5:B5”)
End Sub
For this range of cells, select the “Delete” method.
Code:
Sub XLUP_Example()
Range(“A5:B5”).Delete
End Sub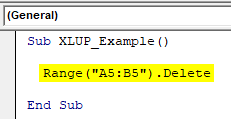
As you can see, we have one optional argument for the “Delete” method as [Shift]. For this argument, we need to enter the argument as “XLUP.”
Code:
Sub XLUP_Example() Range(“A5:B5”).Delete shift:=xlUp End Sub

You can run this code manually or through the shortcut excel key F5 to see the result.

As you can see in Table 1, row number 6 moved up to the 5th row. On the other hand, Table 2 row (colored) is unaltered, so we can do this operation by using the “VBA XLUP” option.
Example #2 – Find Last Used Row by using XLUP
Imagine a situation where you are in the A20th cell (see below image), and your last-used cell is A14.

Now, what will you do by using a shortcut key if you want to choose the last used cell (A14)?
We would use Ctrl + Up Arrow key to move to the last used cell from the current position.
Shortcut Key to Move to Last used Cell
So, the Ctrl + Up arrow selected the last used cell from the current cell. Similarly, in VBA coding, we use END (XLUP) to perform the same.
Now, come back to the VBA coding window.
In this window, we will perform the task of finding the last used row in the worksheet. But, first, create a new subprocedure in the VBA window.
Code:
Sub XLUP_Example1()
End Sub
To store the last used row number. Define the variable as the VBA LONG data type.
Code:
Sub XLUP_Example1() Dim Last_Row_Number As Long End Sub

Now, we will assign the last used row number for this variable.
Code:
Sub XLUP_Example1()
Dim Last_Row_Number As Long
Last_Row_Number =
End Sub
Now use the RANGE object and open this object.
Code:
Sub XLUP_Example1()
Dim Last_Row_Number As Long
Last_Row_Number = Range(
End Sub
Now, mention the active cell (A20) for the RANGE object.
Code:
Sub XLUP_Example1()
Dim Last_Row_Number As Long
Range(“A14”).Select
Last_Row_Number = Range(“A20”)
End Sub
Now, open the END property for the supplied range cell.
Code:
Sub XLUP_Example1()
Dim Last_Row_Number As Long
Range(“A14”).Select
Last_Row_Number = Range(“A20”).End(
End Sub
As you can see above, we have arrow key options like “xlDown,” “xlToLeft,” “xlToRight,” and “xlUp.” Since we are moving up from the A14 cell, choose the “VBA XLUP” option.
Code:
Sub XLUP_Example1() Dim Last_Row_Number As Long Range(“A14”).Select Last_Row_Number = Range(“A20”).End(xlUp) End Sub

After moving up from the A14 cell, we need to mention what we need to do since we need the last used row number. We will use the ROW property.
Code:
Sub XLUP_Example1()
Dim Last_Row_Number As Long
Range(“A14”).Select
Last_Row_Number = Range(“A20”).End(xlUp).Row
End Sub
Now, for the message box, assign the value of the variable “Last_Row_Number.”
Code:
Sub XLUP_Example1() Dim Last_Row_Number As Long Range(“A14”).Select Last_Row_Number = Range(“A20”).End(xlUp).Row MsgBox Last_Row_Number End Sub

You can run this code manually or through shortcut key F5 to see the result.

So, the message box shows the last used row number as 14, so our last data used row number is A14 cell.
In this case, since the data is very small, we started the room cell, but when the data is large, we cannot say which cell to consider first. In such cases, we need to employ a different technique.
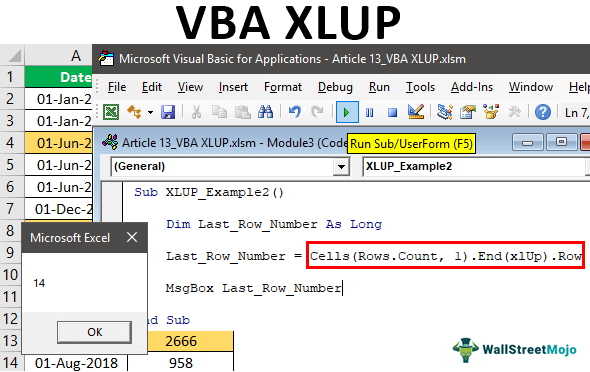
We need to use the CELLS property. Below is an example of the same.
Code:
Sub XLUP_Example2() Dim Last_Row_Number As Long Last_Row_Number = Cells(Rows.Count, 1).End(xlUp).Row MsgBox Last_Row_Number End Sub
You can run this code manually or through shortcut key F5 to see the result.

Instead of a RANGE object, we have used the CELLS property. Let me explain this in detail to you.
ROW.COUNT will count how many rows are there in column 1. What this will do is it will take into consideration the last cell in the worksheet instead of the random cell address. We have used A14 as the random cell address in the above case.
Things to Remember about VBA XLUP
- XLUP is the word used in VBA code to replicate the action of the “Up Arrow” key in Excel.
- VBA XLUP moves from active cells to the above or last-used cell.
- Generally, one may use XLUP along with the END property in VBA.
Recommended Articles
This article has been a guide to VBA XLUP. Here, we discuss how to use XLUP in VBA coding to move cells to a deleted position of cells and to find the last used row in Excel, along with practical examples and a downloadable Excel template. Below you can find some useful Excel VBA articles: –