Table Of Contents
What Is Excel Calendar Drop Down?
Dealing with dates in Excel is tricky and error-prone, especially when working with large or shared datasets. A Calendar Drop Down In Excel is created using data validation to ensure error-free usage, as we can set the dates in the required format so that users can choose the same options.
Key Takeaways
- The Calendar Drop Down In Excel is a feature inserted in a shared Excel worksheet so that the users will have the same option of dates, months, years, etc., in the pre-set format.
- It helps in selecting the dates available in the drop-down instead of manually entering, which in turn saves time and reduces errors.
- We can create Excel Calendar drop down using the existing built-in templates in Excel, or create custom drop-downs using VBA or any other available Add-ins.
- Instead of keeping fixed dates, we can make it dynamic by using the TODAY() andthe EOMONTH() functions, as we learnt in Example 3.
How To Use Calendar Drop Down In Excel?
We can use the Calendar Drop Down In Excel using the following methods, namely:
- Create a Dates Drop Down List.
- Create a Named Range for Start & End Date.
- Create Dynamic Dates.
Examples Of Calendar Drop Down In Excel
We will consider examples to create a Calendar Drop Down In Excel using the above-mentioned ways.
Example #1 - Dates Drop Down List
When we allow the user to enter the data, and want them to enter only a specific set of dates, the Calendar drop-down list comes in handy as it is simple and effective.
The steps to creating a Dates Drop Down List are,
First, we must select the cell to create a drop-down list.

We must click “Data Validation” under the “DATA” tab.

It will open the “Data Validation” window, as shown below.

Alternatively, we can press the shortcut Excel key “ALT + A + V + V” to open the above “Data Validation” window, instead of going through the above steps.We must choose what kind of validation we will create for the drop-down list. So, click the “Allow:” fields drop-down list and select “Date.”

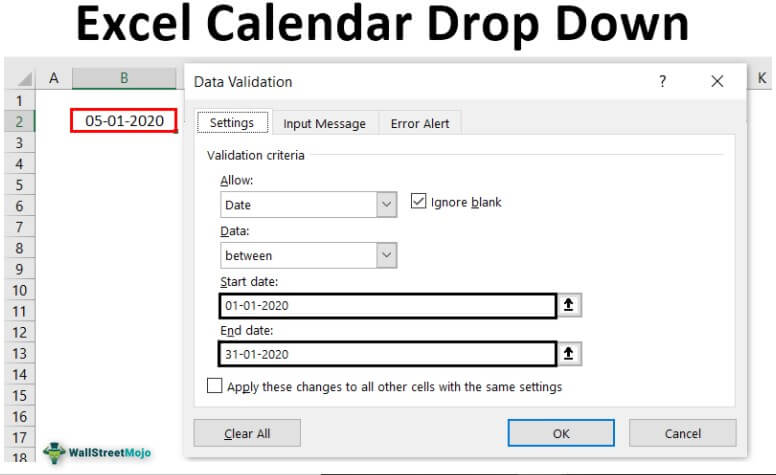
Once the “Date” is chosen, we must enter “Start Date & End Date.”

Let us create data validation from 01st Jan 2020 to 31st Jan 2020, then enter the start and end date as shown below. Finally, click “OK,” and we will exit the data validation window.

However, we do not see any drop-down lists in the selected cell.

But try entering any value here. When we tried entering the value as “hello,” it gave us the warning message, “This value doesn’t match the data validation restrictions defined for this cell.”

Now, enter the date between 01st Jan 2020 to 31st Jan 2020

It accepted the value when we inserted the date between the start and end date. So, like this, we can create data validation to restrict users from entering dates between specific ranges.
Example #2 - Create a Named Range for Start & End Date
In the above example, we have directly supplied the start and end date, but imagine the scenario where we must change the start and end date frequently. Then, we need to create named ranges.
- We must create a start date and end date like the one below.

- We need to select the above data range to name this date range.

- Then, under the "FORMULAS" tab, click "Create from Selection."

- As a result, it will open the window below.

- Since our names are in the selection area on the left side, we must check the “Left Column” box. Then, click “OK”. As a result, it will create a named range.

- Again, we will open the “Data Validation” window; this time, we do not manually enter dates. Then, we will select the box start date and press the “F3” key to bring the list of all the named ranges.

- We must select the start date and end date, respectively. We will have named ranges instead of direct entries of dates.

We can only enter dates between the start and end dates in the selected cell. So, if we want to change start and end dates, change them, and according to the changes made, validation too will vary.
Example #3 - Create Dynamic Dates
If we want the date ranges to be named automatically, we will use the TODAY function.
- For example, if we allow the user to enter dates between starting today and the end of this month, we need to apply the TODAY function for the starting date.

- The next end date applies the EOMONTH function to arrive month-end date.

The TODAY function will keep on changing, and EOMONTH will adjust accordingly. Like this, we can create a calendar date drop-down list.
Important Things To Note
- The named range automatically takes the name from the selection based on the checkbox we tick.
- The drop-down selection will not be available, but we can only enter dates between provided dates.