What is Locking Cells in Excel?
In Excel, cells are locked to protect them from unwanted editing, deleting, and overwriting. Locking cells is specifically beneficial in cases where an excel worksheet needs to be shared with several colleagues.
For example, an organization Z provides consultation in taxation, audit, accountancy, insolvency, and other legal matters. Its finance director has asked Mr. A (subordinate in finance team) to create an Excel worksheet, which consists of:
- Market share captured by Z and its competitors over the past five years
- Deviations of the actual performance from the forecasts of the current year
- Sales revenue figures generated by the sales team in the present year
- Sales projections of the next two years
Further, Mr. A has been asked to share the worksheet with the marketing department to assist it in revising plans. For such inter-departmental collaboration, Mr. A wants his Excel data to be untouched as it circulates. This is where the cell locking property of Excel is used.
When working on shared files, the chances of making accidental changes to the data increase. Moreover, even slight modifications to the Excel formulas can lead to entirely different and erroneous results.
For addressing such issues, Excel provides a lock feature, which is always enabled by default. To confirm that the excel cells are locked, perform the following steps:
- Right-click on a cell and select “format cells.”
- Click the “protection” tab in the “format cells” window.
- The checkbox for “locked” is already selected, implying that the cells are locked.
Lock & Protect Protection of Formula Cells
Before sharing a worksheet, one may want to lock and protect the excel formula cells. This is done to prevent entering an alphabet, a number or space in these cells. Moreover, no one is authorized to delete these cells other than the worksheet creator.
A locked excel cell can be edited or overwritten unless it is protected. To protect only the formula cells, perform the following steps in the mentioned sequence:
- Unlock all cells of the worksheet since they are locked, by default.
- Lock the formula cell.
- Protect the formula cell by protecting the worksheet.
Note: Only locking or only protecting cells does not prevent them from being changed. To secure a cell, it must be locked first and then protected.
How to Lock Cells in Excel?
Let us learn how to lock cells in Excel with the help of the following examples.
Example #1–Lock Only the Excel Formula Cell
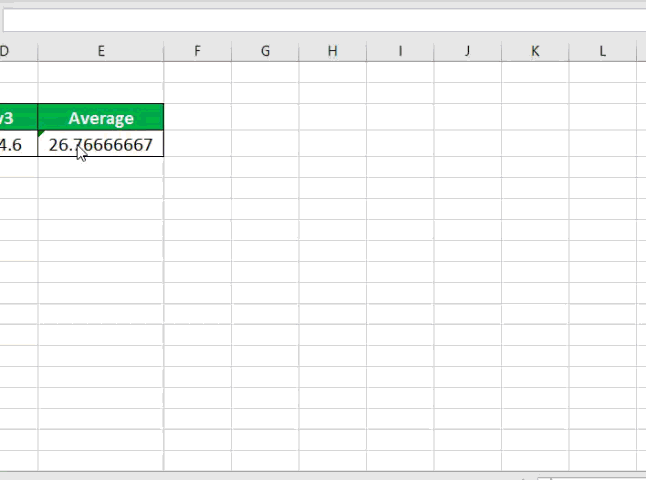
The following table shows three numeric values titled “v1,” “v2,” and “v3.” We want to calculate the average of these values.
Further, lock and protect the cell in excel, which displays the formula of average.
The steps to calculate the average and thereafter protect the formula cell are listed as follows:
Step 1: Enter the average formula in cell E4.

Step 2: Unlock the already locked cells of the excel table. For this, select any cell within the table and press “Ctrl+A” (or Command+A) together.
Alternatively, unlock the entire worksheet by selecting any cell outside the table and pressing “Ctrl+A.” The subsequent steps 3 and 4 can also be applied for unlocking the worksheet.

Step 3: Press “Ctrl+1” (or Command+1) together. The “format cells” dialog box appears, as shown in the following image.
Alternatively, right-click the selection and choose “format cells” from the context menu.

Step 4: In the “protection” tab, deselect the “locked” option. Click “Ok.”

Step 5: All the cells of the table are unlocked.
Step 6: Select the cell containing the formula (E4). Perform the following steps in the mentioned sequence:
- Press “Ctrl+1” together.
- The “format cells” dialog box opens.
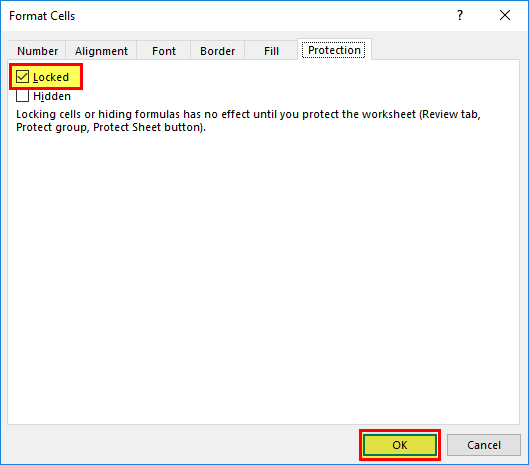
- In the “protection” tab, select the “locked” option, as shown in the following image.
- Click “Ok.”
The formula cell E4 is locked.
Step 7: Protect the formula cell by clicking “protect sheet” in the Review tab.
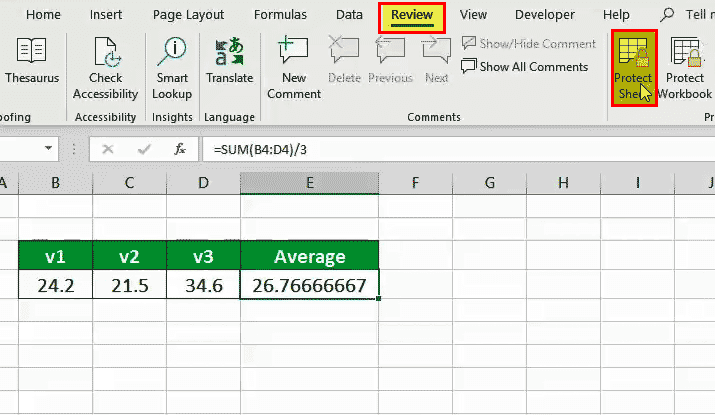
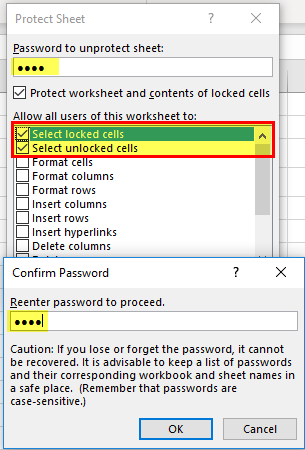
Step 8: Enter a password and click “Ok.” Confirm the password and click “Ok” again.
Note: It is optional to enter a password. In case a password is not provided, anyone using the Excel worksheet can unprotect the sheet and change its content.
Step 9: The formula cell is locked and protected in excel. If you try to edit the cell E4, a message appears stating that the cell is protected.
The same is shown in the following image.

Only the formula cell E4 is protected. If you try to overwrite any other cell of the given table, no message is displayed. This is because the remaining cells of the table are not protected.
Note: Only the locked cells in Excel can be protected.
Example #2–Lock Only the Final Excel Formula Cell
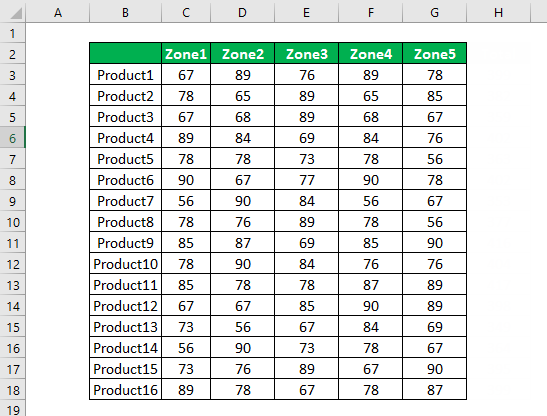
The following table shows the zone-wise sales (in $) of 16 different products. We want to calculate the total sales of each product.
Further, lock and protect the cell in excel which displays the highest sales of a product. The cells containing sales and total product sales should remain editable.
The steps to calculate the total product sales and thereafter protect the final formula cell are listed as follows:
Step 1: Enter the following formula in cell H3 to calculate the total sales of each product.
“=SUM(C3:G3)”
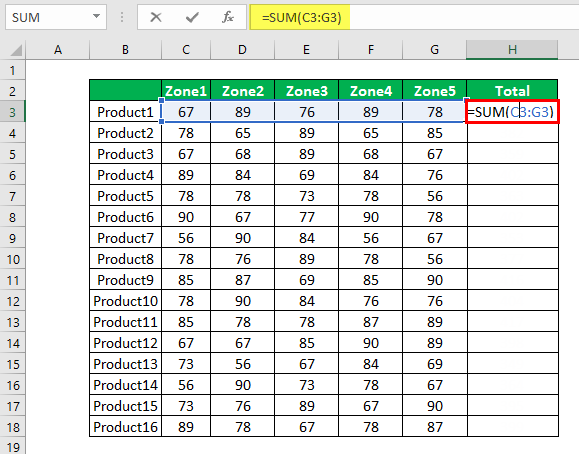
Step 2: Press the “Enter” key and drag the formula to the remaining cells, as shown in the following image.
Note: A green triangle appearing on top of the cells of column H (range H3:H18) indicates that the formulas are unlocked.

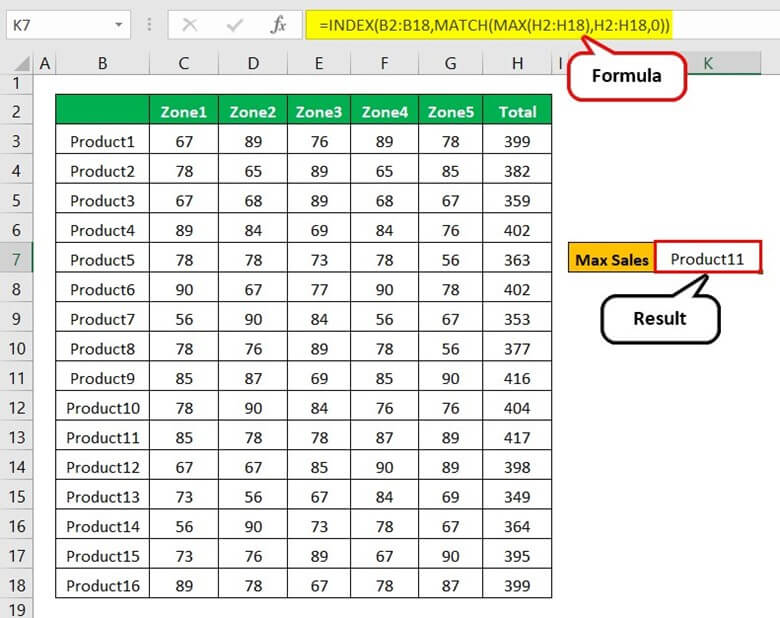
Step 3: Enter the following formula in cell K7 to identify the product with the highest sales.
“=INDEX(B2:B18,MATCH(MAX(H2:H18),H2:H18,0))”
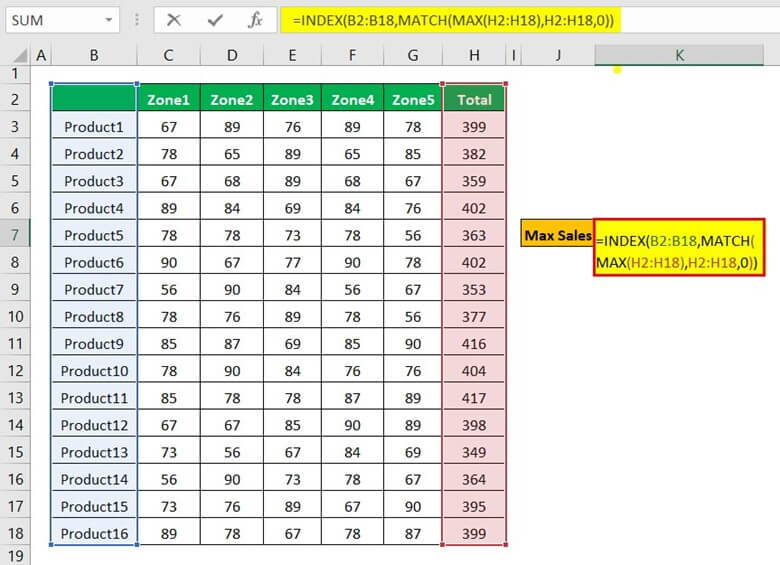
Step 4: Press the “Enter” key. The product with the highest sales appears in cell K7.
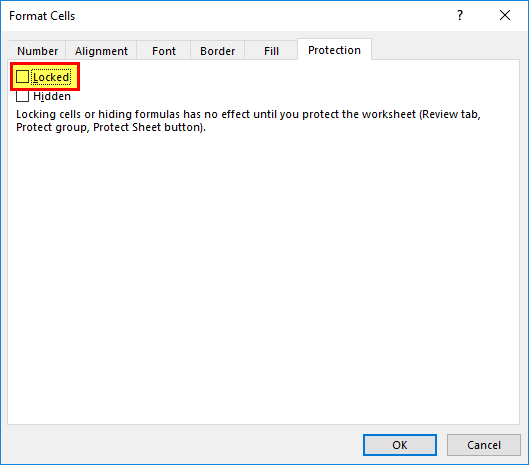
Step 5: To protect only the formula cell K7, unlock all the cells of the worksheet in the mentioned sequence:
- Press the keys “Ctrl+A” together. This selects all the cells of the worksheet.
- Press the keys “Ctrl+1” together. This opens the “format cells” dialog box.
- In the “protection” tab, deselect the “locked” option.
- Click “Ok.”
All the cells of the worksheet are unlocked.
Step 6: To lock cell K7, perform the following steps in the mentioned sequence:
- Select the cell K7 containing the formula.
- Press “Ctrl+1” together.
- In the “format cells” dialog box, select the “locked” option under the “protection” tab.
- Click “Ok.”
The formula cell K7 is locked in excel.
Step 7: To protect cell K7, perform the following steps in the mentioned sequence:
- In the Review tab, click “protect sheet.”
- Enter a password and click “Ok.”
- Confirm the password and click “Ok.”
Hence, the formula cell K7 is locked and protected. The remaining cells containing sales (columns C to G) and total product sales (column H) are editable.
Note: Once a sheet is protected, the “unprotect sheet” option appears in the Review tab, as shown in the following image.

Example #3–Lock all the Excel Formula Cells
Let us understand the protection of Excel formulas with the help of the “go to special” feature.
The following table shows the oil prices of different cities for August and September 2018. We want to calculate the median prices for the given months. In addition, identify the month with the higher median price.
Further, lock all the cells which contain formulas by using the “go to special” feature.
The steps to calculate the median prices and thereafter protect all the formula cells are listed as follows:
Step 1: Enter the following formula in cell G4 to calculate the median prices for August.
“=MEDIAN(C3:C16)”
Press the “Enter” key and the output appears in cell G4.
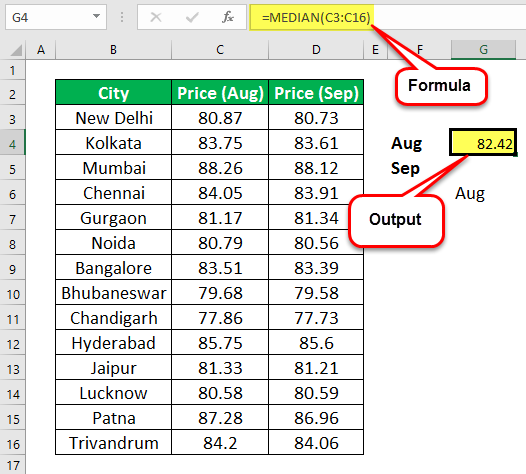
Step 2: Enter the following formula in cell G5 to calculate the median prices for September.
“=MEDIAN(D3:D16)”
Press the “Enter” key and the output appears in cell G5.

Step 3: Enter the following formula in cell G6 to identify the month with the higher median price.
“=INDEX(F4:F5,MATCH(MAX(G4:G5),G4:G5,0))”
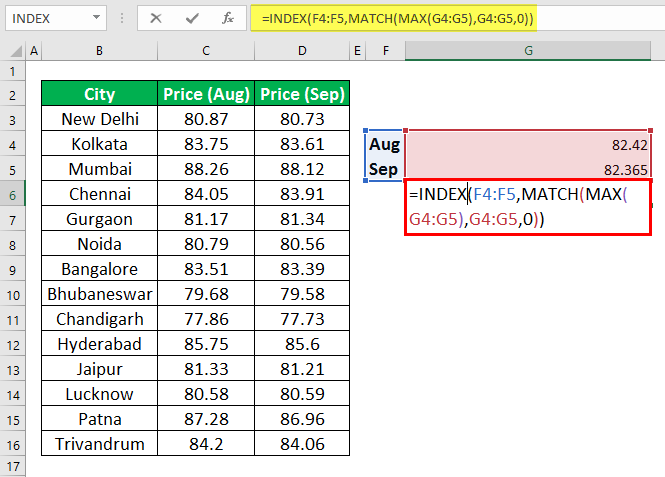
Step 4: Press the “Enter” key. The month with the higher median price appears in cell G6.

Step 5: To protect the cells containing the formula, unlock all the cells in Excel. For this, perform the following steps in the mentioned sequence:
- Select all the cells of the worksheet by pressing “Ctrl+A” together.
- Press “Ctrl+1” together and the “format cells” dialog box opens.
- In the “protection” tab, deselect the “locked” option.
- Click “Ok.”
All the cells of the worksheet are unlocked.

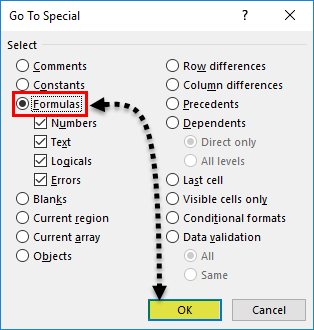
Step 6: In the Home tab, click the “find and select” drop-down in the “editing” group. Select the “go to special” option, as shown in the following image.

If you are using Mac, select “go to” in the Edit tab. Click “special.”

Step 7: The “go to special” dialog box opens. Select “formulas” and click “Ok.”
Step 8: All the cells containing the formulas (G4, G5, and G6) are selected. To lock these excel cells, perform the following steps in the mentioned sequence:
- Press the keys “Ctrl+1” together.
- The “format cells” dialog box appears, as shown in the following image.
- In the “protection” tab, select the “locked” option.
- Click “Ok.”

Step 9: To protect the formula cells, perform the following steps in the mentioned sequence:
- Click “protect sheet” under the Review tab.
- Enter a password (optional) and click “Ok.”
- Re-enter the password to confirm it.
- Click “Ok.”
All the formulas cells (G4, G5, and G6) are now protected.

Frequently Asked Questions (FAQs)
What does it mean to lock cells in Excel and how is it done?
Locking excel cells is a technique of protecting them from changes like editing, deleting, and overwriting. It is possible to lock and unlock either a part or the entire worksheet.
For instance, it is possible to lock specific cells and leave the remaining data unlocked. Likewise, the user can edit the raw data (input cells), but the formula cells that calculate the output can be locked.
By default, the worksheet is locked. To lock or unlock the entire excel worksheet, the steps are listed as follows:
a. Select the entire worksheet by pressing “Ctrl+A.”
b. Right-click the selection and choose “format cells” from the context menu.
c. Select the “locked” option to lock all cells. Alternatively, uncheck the “locked” option to unlock all cells.
d. Click “Ok.”
All cells of the worksheet are locked or unlocked depending on the action performed in “step c.”
How to lock and protect specific cells in Excel?
The steps to lock and protect specific cells in Excel are listed as follows:
a. Unlock all cells of the excel worksheet
• Select the entire worksheet by pressing “Ctrl+A.”
• Right-click the selection and choose “format cells” from the context menu. Alternatively, press “Ctrl+Shift+F” or “Ctrl+1.”
• In the “format cells” dialog box, uncheck the “locked” option. Click “Ok.”
b. Select the cells or ranges to be locked.
• For adjacent cells–select the cells to be locked with the help of “Shift” and the arrow keys.
• For non-adjacent cells–select the cells to be locked by pressing and holding the “Ctrl” key.
c. Lock the selected cells
• Press “Ctrl+1” together and the “format cells” dialog box opens.
• Select the “locked” option in the “protection” tab. Click “Ok.”
d. Protect the worksheet
• Click “protect sheet” in the “changes” group of the Review tab. Alternatively, right-click the sheet name appearing at the bottom left-hand side. Select “protect sheet” from the context menu.
• Enter a password which is optional and click “Ok.”
• Confirm the password and click “Ok.”
The specific cells are locked and protected while the remaining cells are editable.
Note: While entering the password, you can select the actions that the users are allowed to perform.
How to lock multiple cells and protect them without using a password in Excel?
For locking multiple cells, an important point to consider is the selection of cells. It is possible to select a range of cells which can be either adjacent or non-adjacent. The selection of ranges is carried out as follows:
• For an adjacent range: Select by using the “Shift” and arrow keys together.
• For a non-adjacent range: Select by pressing and holding the “Ctrl” key.
• For one column: Select any cell within the column to be locked and press “Ctrl+Space.”
• For multiple non-adjacent rows or columns: Click the different row or column labels (on the left or on top) by pressing and holding the “Ctrl” key.
Once the cells are selected, they can be locked and protected. This is done by pressing “Ctrl+1” and selecting the “locked” option in the “protection” tab. Further, click “protect sheet” under the Review tab.
Cells can be protected without supplying a password as well. For this, just omit supplying the password while protecting a sheet in the Review tab.
However, one must remember that if a password is not provided, the worksheet content can be changed by anyone. This is because the “unprotect sheet” option can be availed by any user.
Recommended Articles
This has been a guide to lock cells in Excel. Here we discuss how to lock excel formula cells in Excel, along with practical examples and downloadable Excel templates. For more on Excel, take a look at the following articles–