Unprotect Workbook in Excel
Unprotecting a workbook in Excel helps us do changes. But, we need to protect workbook to prevent readers from tampering with the data;
There are two ways of protecting the workbook in Excel. In our earlier article, “Protect Workbook in Excel,” we have seen how to protect the workbook in those two ways. Below are the steps to protect and unprotect the workbook in Excel.
Excel Workbook Protection at File Level
In this method, we are protecting the entire workbook from opening and editing the content of the workbook.
The option of “Protect Workbook” is a built-in tool in Excel. It is available under the “Review” tab in Excel.
To protect the workbook, below are the steps.
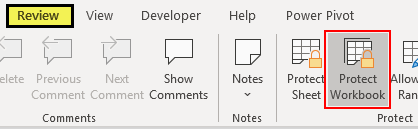
- First, we must open the Excel workbook that we need to protect.
- Then, go to the “Review” tab and click on the “PROTECT WORKBOOK” option.
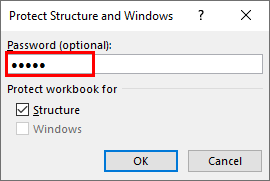
- Now, we can see the below option, where we need to enter a password to protect. In the below “Protect Structure and Windows” window, enter the password as per the choice.

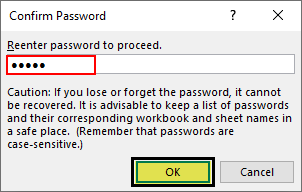
- Next, click on “OK.” In the next window, we need to re-enter the same password we entered in the previous step.
Click on “OK.” It will protect the workbook at the file level.

Excel Workbook Protection at Workbook Level
In the previous step, we have seen how to protect the workbook at the file level. In this method, we can preserve the workbook at the workbook level, which will prevent a user from opening it when you are not around with your computer.
Using this method, we restrict the user from peeping into the workbook. Follow the below steps to protect the workbook at the workbook level.
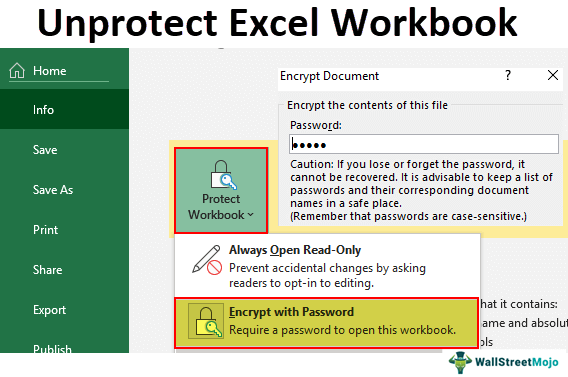
Step 1: First, go to the “File” option, which is the first in the ribbon.
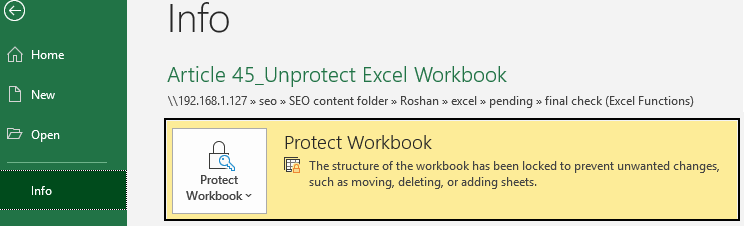
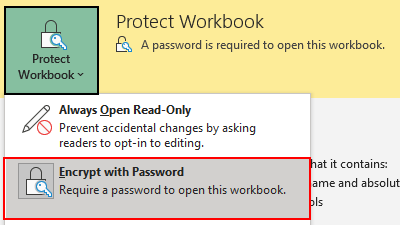
Once we click on the “File” option, we may see the Protect Workbook option on the right-hand side, as shown in the below image.
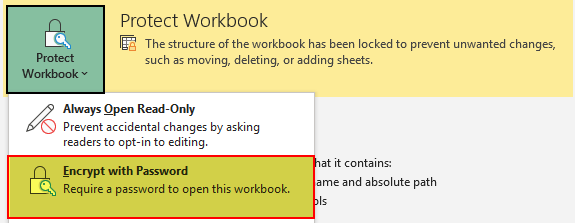
Step 2: Next, in the “Protect Workbook” option, click on the drop-down list in excel to see the option “Protect Workbook” in the list, and then, select “Encrypt with Password.”
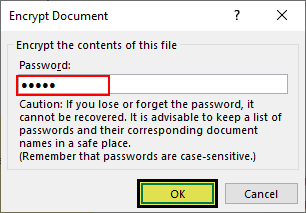
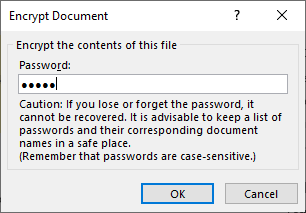
Step 3: Now, we will see the “Encrypt Document” window. Next, enter the password and then, click on the “OK” button.
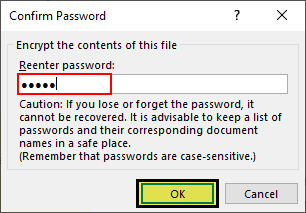
Step 4: Now, in the next window, we will see the window which asks us to re-enter the password we entered in the previous step.
One thing is we need to remember the password that we have entered.
Once you have re-entered the password, save and close the workbook. All the changes that we made will apply to the workbook.
Next time when we need to open the workbook, it will ask us to enter the password.

Unprotect Excel Workbook
Once the workbook is protected with a password, to unprotect it, we need to remember the exact password that we have entered while preserving the workbook. Follow the below steps to unprotect the protected workbook in Excel.
Step 1: First, open the desired workbook.
Step 2: Next, it will ask you to enter the password.
Step 3: Then, enter the password that you had given while protecting it.

Step 4: Now, click on “OK.” It will open the workbook.
Step 5: Next, to unprotect, click on the “File” tab. You will see the “Protect Workbook” option.

As we can see just below the “Protect Workbook” option, it says, “A password is required to open this workbook.”
Step 6: Now, click on the drop-down list, and then, choose “Encrypt with Password.”
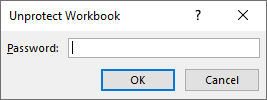
Step 7: Now, we will see the below window.
Now, we can see the password with black dots, so to unprotect the workbook, delete the password and then, click on “OK.”
The Excel workbook is unprotected and no longer requires a password to open it.
Things to Remember
- Password is mandatory to open the workbook if it is protected with a password.
- But for unprotecting, the workbook password is not required. We can delete the password and unprotect the workbook.
- The “Protect Workbook” and “Protect Worksheet” are different from each other.
Recommended Articles
This article has been a guide to Unprotect Workbook in Excel. Here, we learn to unprotect the Excel workbook, methods, and downloadable Excel template. You may learn more about Excel from the following articles: –