What Is Protect Workbook In Excel?
Protecting Excel workbooks is a method where we save the whole workbook rather than a single sheet. It means saving the entire structure of the workbook. If a workbook is protected with a password, no other user can insert a new sheet or delete any sheet. Neither can they view the hidden sheets or even change the name of the worksheets in the workbook.
In this article, let us learn how to protect an Excel workbook in Excel with examples and detailed step-by-step instructions.
- Protecting Excel workbooks involves saving the entire structure of the workbook, not just a single sheet. This method ensures that no user can insert, delete, view hidden sheets, or change the name of the worksheets in the workbook, even if protected with a password.
- Protecting workbooks differs from protecting worksheets. Excel 2013 and above only protect the workbook’s structure due to the disabled “Resize” option. Excel 2010 and below allow protection of both structure and windows size options.
- To ensure security, it’s advisable to use a password for Excel workbooks, as losing it cannot be reversed.
How To Protect An Excel Workbook?
Follow the below steps to learn how to protect a workbook.
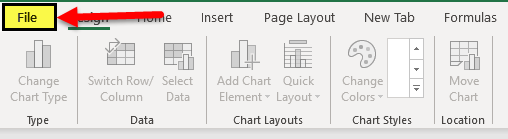
- Go to the “File” tab and click on it.
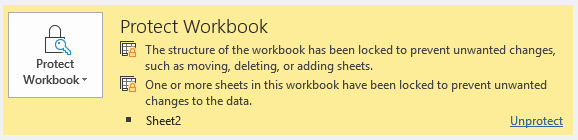
- Once we click on the “File” tab, we can see various options. For example, we see a box protecting the workbook in the info section.
It says that the workbook’s structure is locked to prevent any changes.

- If the workbook is not protected, the message would be as follows:


Examples
Example #1
First, we will try to protect a workbook as a whole so that nobody can make any change in any of the worksheets or any cells without any password.
In this example, we are using Excel version 2013, so we will protect the workbook’s structure and then try to change the name of worksheet 3, which we have named “Anand.” Now, we want to change it to “Aran.”
It is very simple.
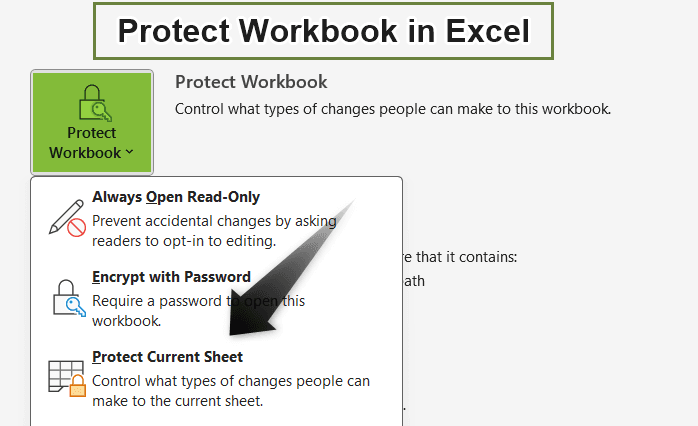
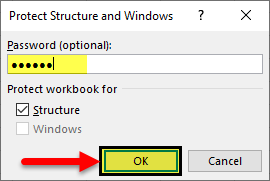
1) Click on “Protect Workbook” under the changes section in the “Review” tab.
2) A dialog box pops up.
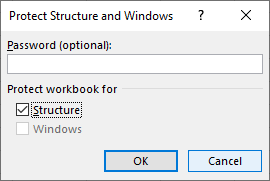
3) We will enter the same password, “EDUCBA,” to protect our Excel workbook and click on “OK.”
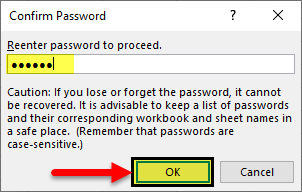
4) It asks us to re-enter the password.
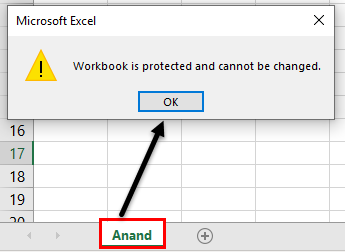
5) Now, let us see what the original name of “Sheet 3” was earlier.

6) Now, the workbook is protected. Next, double-click on the sheet name. As a result, we get the following display message.
7) We can also try to right-click on sheet 3 to see if we can change the sheet name by that method.

We can see that the “Rename,” “Insert,” “Delete,” or “Move,” and the “Copy” options have been disabled as we have protected the workbook.
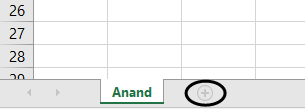
8) We can also try to add a new worksheet from the “plus” sign beside the worksheet named “ANAND,” but we can see that we cannot as the “+” sign is disabled.
After protecting the workbook’s structure, any user cannot make changes to the protected workbook’s structure.
Example #2
For example, consider a situation where teachers have to protect the workbook containing the key answers for a class test. Let us learn how to protect the workbook in Excel.
The steps to protect the workbook in Excel are:
Step 1: Press CTRL + A to select the whole sheet and click on File tab.
Step 2: Next, select Info > Protect Workbook option under the Info section.

Step 3: Click the down arrow button of the protect workbook.
Step 4: Select the Encrypt with Password option from the drop-down list.

The Encrypt Document window pops up.
Step 5: Now, in the Password box, enter the password and select the OK button.

Step 6: The Confirm Password window pops up. Re-enter the password in the Password text box.
Select the OK button.

Likewise, we can protect workbook in Excel.
Important Things To Note
- Protecting workbooks is different from protecting worksheets.
- In Excel version 2013 and above, we can only protect the workbook’s structure. This is because, in later versions, the Windows “Resize” option is disabled.
- In Excel version 2010 and below, we can protect both structure and windows size options as resize available in the previous versions of Excel.
- It is advised to protect an Excel workbook with a password so that any other user cannot unprotect it easily and change the workbook’s structure.
- It is also recommended to remember the password, as once the password is lost, we cannot unprotect the Excel workbook again.
Frequently Asked Questions
1. What is the benefit of protecting a workbook?
One may use a password to safeguard the structure of your Excel workbook so that other users cannot read hidden worksheets, create, move, delete, or hide worksheets, or rename worksheets.
2. What are the three ways to protect a workbook?
There are three main methods for preventing theft or limiting editing capabilities in an Excel sheet:
• Encrypt the workbook with the password protection option in Microsoft Excel.
• Converting the workbook to PDF format.
• Protecting the workbook with a structural password in Microsoft Excel.
3. Where is Protect workbook option?
To save your workbook, one must follow the following procedure:
1. Go to the ‘File’ tab to access the ‘Backstage’ view.
2. From the ‘Info’ pane, choose the ‘Protect Workbook’ command.
3. Select the most suitable choice from the dropdown menu.
Recommended Articles
This article is a guide to Protect Workbook in Excel. We learn how to protect the workbook in Excel, practical examples, and downloadable Excel templates. You may learn more about Excel from the following articles: –