What is Moving Columns in Excel?
Moving a column in excel means shifting the data of one column to another. It is similar to interchanging or swapping the data of two or more columns. When a column or row is moved, Excel copies the formulas, formatting, hidden cells, outputs, and comments to the new location. However, in some cases, the cell references within the formulas may have to be modified manually to match the changed position.
For example, the manager of the payroll department wants to view the name and the monthly salary of each employee in columns A and B respectively. Since this data is currently in columns D and G, a movement of columns to the new position is required.
The purpose of moving excel columns is to organize the dataset in the required format. Moreover, a movement allows one to view specific columns next to each other. Therefore, the reordering (or moving) of columns helps the user to view the data in the desired sequence.
How to Move Columns in Excel?
In Excel, columns can be moved by using either of the following techniques:
- “Shift” key
- “Insert cut cells” option
In this article, the movement of columns by both techniques has been demonstrated. Further, the mouse has been used under the two methods.
Note: It is not possible to move non-adjacent columns and rows of Excel by using the mouse.
Example #1 – Move Columns Using the “Shift” Key
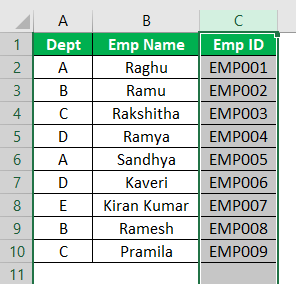
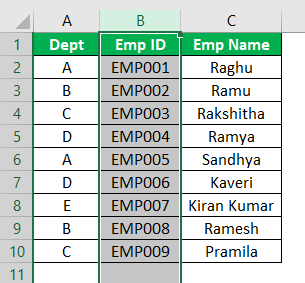
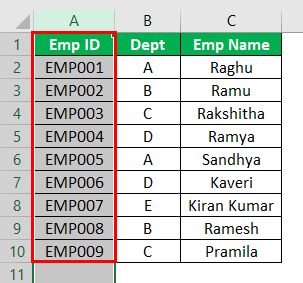
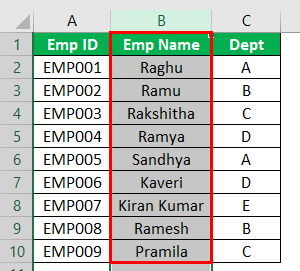
The following image shows the names of certain employees (column B), their IDs (column C), and the departments (column A) they are working in.
We want to arrange the given dataset in the following sequence:
- “Emp name” should be in column A.
- “Emp ID” should be in column B.
- “Dept” should be in column C.
Move the required excel columns by using the “Shift” key.

The steps to rearrange the columns by using the “Shift” key are listed as follows:
Step 1: Select the rightmost column of the dataset. This column is titled “emp ID.” For selecting this column entirely, click the letter “C” appearing at the top of this column. Alternatively, select any cell within this column and press the keys “Ctrl+space” together.
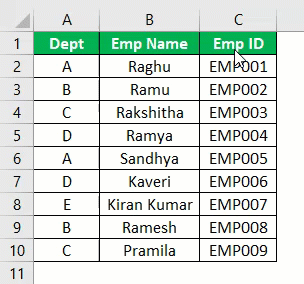
The selection is shown in the following image.
Step 2: Place the cursor at the right edge of the selected column. The regular cursor changes to a four-point arrow cursor, as shown in the following image.

Step 3: Once the four-point arrow cursor appears, press and hold the “Shift” key. At the same time, drag column C to the left edge of column A by using the mouse.
On dragging, a faint vertical line (in green) appears on the left edge of column A. This line indicates the position where the selected column (column C) will be moved. Moreover, there is a small box containing “A:A,” which shows that the selected column will be moved to column A.
The following image shows the faint vertical line (appearing in green) and the small box within red rectangles.
Note: Remember to hold the “Shift” key throughout the dragging process. Further, on some devices, the faint vertical line may appear in grey.

Step 4: On reaching the left edge of column A, leave the “Shift” key and release the mouse. The “emp ID” column shifts from column C to column A. Consequently, the columns “dept” and “emp name” (initially columns A and B) shift rightwards to columns B and C respectively.
The movement of column C to column A is shown in the following image.
Step 5: Likewise, drag the “emp name” column (currently column C) to the left edge of column A by pressing and holding the “Shift” key. This is because we want this to be the first column of the dataset followed by the “emp ID” and “dept” columns.
The movement is shown in the following image. As a result of this movement, “emp ID” and “dept” columns shift rightwards to columns B and C respectively.
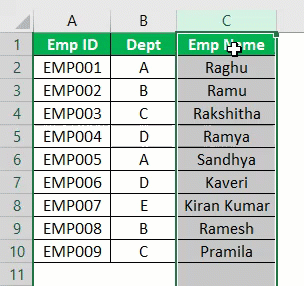
In the final dataset, “emp name” is in column A, “emp ID” is in column B, and “dept” is in column C. Hence, all the columns of the dataset have been reordered according to the requirement.
Note: For moving multiple adjacent excel columns, refer to the second question under “frequently asked questions.” This section is at the end of this article.
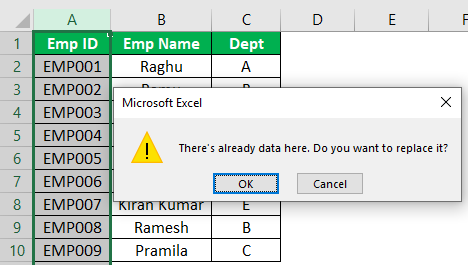
Let us observe what happens when one forgets to press and hold the “Shift” key (in step 3), while dragging one column to the other. In the following image, the three columns “emp name,” “emp ID,” and “dept” have been arranged in a random order.
Without pressing the “Shift” key, drag column C to column A with the four-point arrow. Excel displays a message, which asks the user if the data of column A needs to be replaced or not.
If the user clicks “Ok,” the data of column A is replaced with that of column C. However, the initial data of column A is lost in the process. Clicking “cancel” does not reorder columns A and C.
Hence, to avoid loss of data, it is essential to press and hold the “Shift” key while dragging one column to the other.
Example #2 – Move Columns Using the “Insert Cut Cells” Option
Working on the dataset of example #1, columns A, B, and C contain the department, employee ID, and employee name respectively.
We want to arrange the dataset in the following sequence:
- “Emp ID” should be in column A.
- “Emp name” should be in column B.
- “Dept” should be in column C.
Use the “insert cut cells” option to move the excel columns.
The steps to rearrange the columns by using the “insert cut cells” option are listed as follows:
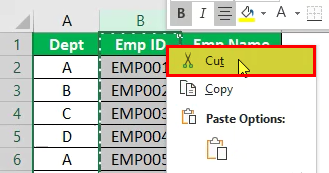
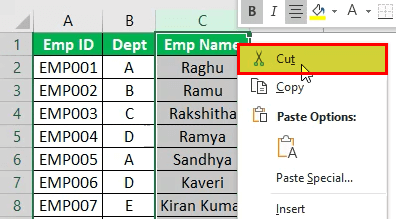
Step 1: Select the “emp id” column. For selecting, click the letter “B” appearing at the top of this column. Alternatively, select any cell of the “emp id” column and press the keys “Ctrl+space” together.
The selected column is shown in the following image.
Step 2: Right-click the selected column and choose “cut” from the context menu. Alternatively, keep column B selected and press the shortcut keys “Ctrl+X” together.
By cutting column B, a moving border appears around it, as shown in the following image.
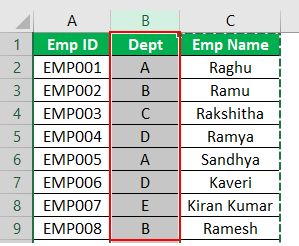
Step 3: Select the column where the column that has been cut (column B) needs to be inserted. Since the entire cut cells need to be inserted in column A, select the same. This is shown in the following image.
Note: The cut column may be inserted either at the position of the selected column or just before the selected column. In this case, the cut column is column B and the selected column is column A.
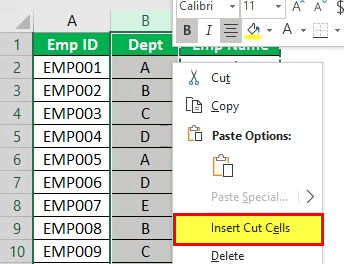
Step 4: Right-click the selected column (column A) and choose “insert cut cells” from the context menu. The same is shown in the following image.
Note: If one presses the keys “Ctrl+V” to paste the cut cells, the initial (existing) content of the destination cells is lost.
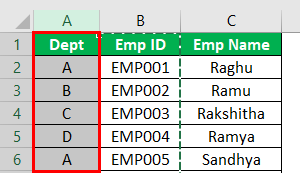
Step 5: The “emp ID” column is inserted at the first position (column A) of the worksheet. As a result, the initial column A (“dept” column) shifts rightwards to column B. The “emp name” column stays at its place (column C).
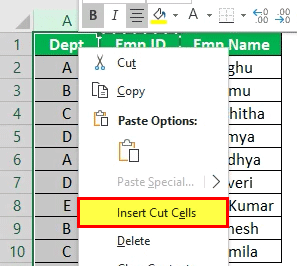
Step 6: Move “emp name” to column B. For this, select the “emp name” column, which is the current column C. Right-click the selection and choose “cut.” This is shown in the following image.
Step 7: Select column B as the “emp name” column needs to be inserted at this location. The selection of column B is shown in the following image.
Step 8: Right-click column B and choose “insert cut cells,” as shown in the following image.
Step 9: The “emp name” column has been pasted in column B. The newly pasted column is shown within a red box in the following image.
The columns of the dataset are rearranged in the required sequence. Hence, in the final dataset, “emp ID” is in column A, “emp name” is in column B, and “dept” is in column C.
Recommended Articles
This has been a guide to move columns in Excel. Here we learned through practical examples, how to move columns in Excel by dragging or cutting them. The downloadable templates are available on the website. You may learn more about Excel from the following articles –