
Table Of Contents
Key Takeaways
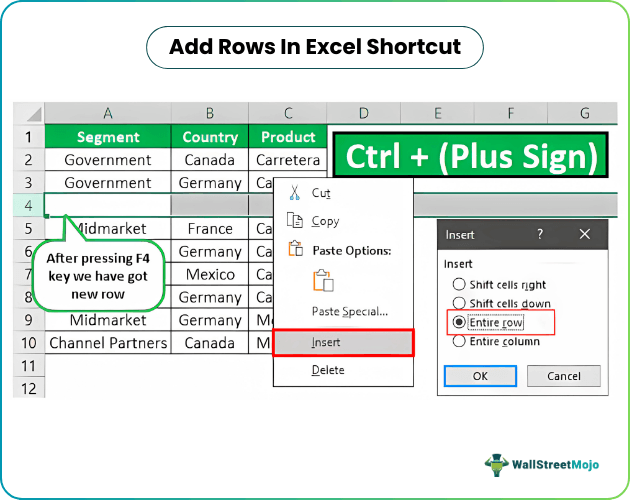
- We can Add Rows in Excel in many ways, such as using the shortcut keys Ctrl + Plus sign, F4 keys, right-click on rows, from the “Home” tab, etc.
- The shortcut key may vary from keyboard to keyboard. If the keyboard has a number pad, we can press the Ctrl + Plus sign or the Ctrl + Shift+ = sign.
- We must understand that Shift + = is nothing but a plus sign. When we do not have a number pad, we must use the numeric keys available in combination with the shift, alt, or ctrl keys.
What Is Add Rows In Excel?
Add Rows in Excel is an option to insert extra rows in-between a dataset in a worksheet. We have a simple key as a shortcut to Add Rows in Excel, i.e., Ctrl + Plus sign. If your keyboard has a number pad to the right, you can use Ctrl + Plus sign. But if you do not have a number pad, press the Excel shortcut key “Ctrl + Shift + =”.
For example, after we have created a table in Excel, to add additional rows, we can use – Ctrl + Plus sign or Ctrl + Shift + Plus sign to insert a row. Even if you have added the new cells within the existing range or adjacent to the table, they will automatically be formatted to go well with the current table style.
The essential ingredients are cells, rows, and columns for Excel, as shown below.
How To Add/Insert Rows In Excel?
A few ways to Add/Insert Rows In Excel are as follows:
- Shortcut key – Ctrl + Plus sign. We are discussing shortcuts to increase productivity and do jobs quicker than manual efforts. Hence, shortcuts are the key elements to increasing your productivity in Excel.
- Right-click on any row – When we right-click on rows, where we want a new row, we get the insert option. We can click accordingly.
- Excel ribbon – Home tab - Cells group - Insert option drop-down - Insert Sheet Rows option.
Examples
We will consider some scenarios to Add Rows in Excel.
Example #1
Look at the below data in the Excel worksheet.

The steps to Add Rows in Excel are,
Before adding a new row, it is essential to know where to add it. To add a row after the 3rd row, we need to select the row after the 3rd row.

Right-click on the 4th row (Midmarket), and select the “Insert” option.

It will show the below option dialog box.

It is essential to understand this “Insert” dialog box. We have four options: “Shift cells right,” “Shift cells down,” “Entire row,” and “Entire column”.Select the option “Shift cells down,” and click “OK” to see what happens.

Since we have selected the option of “Shift cells down”, it has shifted the selected cell to the down cell but not the entire row. So, it is essential to remind yourself about this whenever you do this operation. If this goes unnoticed, it will wrongly organize all the data.

Since we are inserting a new row, we must choose “Entire row” in the “Insert” dialog box, and click “OK.”

It will shift the entire row data to the below row by adding a new row in the selected row cell.

Now, suppose we want to insert one more row. We need not perform all these actions again. Instead, we can press the F4 key by selecting the row you want to push below.

This function key can repeat the previous set of activities performed in the worksheet.
Example #2
The above example might be confusing because there are four options in the “Insert” window. Rather than just selecting a row cell, we will select the entire row itself.
The steps to select the entire row to Add Rows in Excel are,
- Step 1: To select the entire row, press the shortcut key Shift + Space key. It will choose the whole row for you.

- Step 2: Now, press the shortcut key Ctrl + Plus sign. It will insert a new row for you by pushing the selected row below.

- Step 3: Press the F4 function key to repeat the previous action performed in Excel. So, the number of times you press the F4 key, the number of times it will insert the new row for you (if any other action is not performed after inserting the row).

Example #3
We will now see to Insert More than One Row in a dataset at once and not doing it numerous times like in the last example. So, we have a technique to encounter this.
The steps to Insert Multiple Rows in Excel are,
- Step 1: Select as many rows in a dataset as possible. No worries, even if there are cell values.
- Here, first, if you want to insert three rows at once, select 3 rows as Rows 4,5, and 6, as shown below.

- Step 2: Now, press the shortcut key, Ctrl + Plus sign, or Ctrl + Shift + = sign.

The moment we press the shortcut key, it pushes all the selected rows down, and adds those many new rows, as shown above.
Shortcut Keys To Add Rows In Excel
Some of the shortcut keys to Add Rows in Excel are,
- Shortcut Key to Select Entire Row:

- Shortcut Key to Add New Row:

Important Things To Note
- The F4 function repeats the previous action, if the previous step was inserting rows using the right-click option.
- We can insert as many rows as selected before pressing the shortcut key. For example, if you choose two rows, it will insert two rows, if you have chosen three, it will insert three, and so on.
Frequently Asked Questions
In a given dataset, we may have AutoFilled some data like serial numbers, font formatting, etc. If we need to insert a single row or multiple rows in-between the data values, then we use the Add Rows in Excel feature, because it helps us add or insert extra rows in-between the dataset without changing the formatting styles which saves time.
A few methods to Add/Insert Rows In Excel are as follows:
1. Shortcut keys Ctrl + Plus sign or Ctrl + Shift + = sign - Using these shortcut keys helps us save time. If there is no number pad available, then we can use a combination of numeric keys and universal keys such as ctrl, shift, or alt.
2. Right-click on any row – When we right-click on rows, we get the insert option.
3. Excel ribbon – Home tab - Cells group - Insert drop-down - Insert Sheet Rows option.
First, select the row in the dataset to add a row.
Next, select the “Home” tab - go to the “Cells” group - click the “Insert” option drop-down - select the “Insert Sheet Rows” option, as shown below.
