What Is Create Excel Templates?
Create Templates in Excel are templates or blueprints for Excel that help us avoid repetitive tasks of adding and memorizing parameters frequently. We may find some built-in templates in Excel that we can use as it is or customize them as per our requirements, or we can create our own templates and save them for future use.
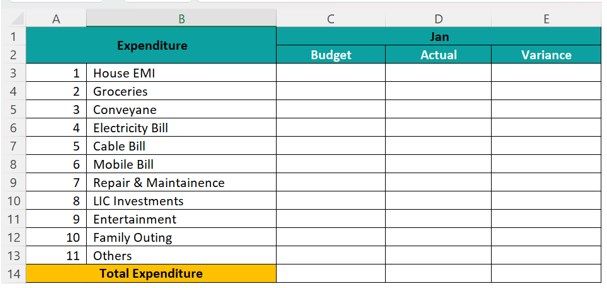
For example, we have many templates such as Calendar Templates, Expense Planner Templates, Personal Budget Templates, etc., either inbuilt in Excel or we can use from some third-party websites. One such template, known as the Personal Budget Template with the parameters of our main expenses, is shown in the below image.
Key Takeaways
- The Create Templates in Excel is to use an Excel template or to create a perfect first copy and duplicate it many times. So, invest an awful lot of time in designing the first copy.
- Since these templates are created from the beginning, it allows us to design the template according to our requirements, and add sections and features accordingly. Embedding the necessary formulas in the appropriate cells will result in a fully-automated template, which we can use repeatedly.
- Even with the inbuilt templates, we can customize and modify them as per our requirements.
How To Select Standard Excel Template?
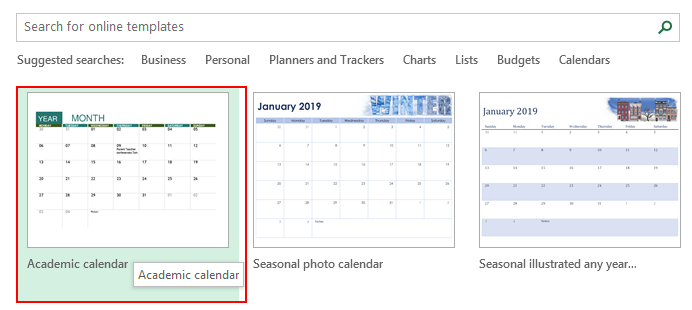
To select a standard Excel template, first, open an Excel workbook, and go to “File à New”.
We will see a screen, as shown below.

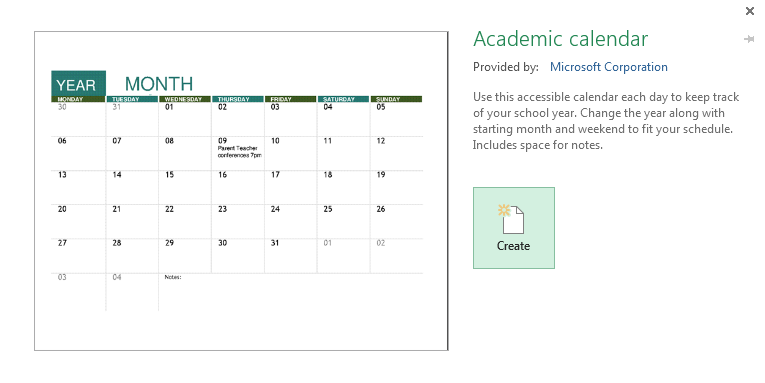
It allows us to select from some predefined options divided by various categories. Then, we can choose the one relevant to our requirement and double-click on it to use that template. For example, suppose we select the “Academic Calendar” (any year) and double-click on it.
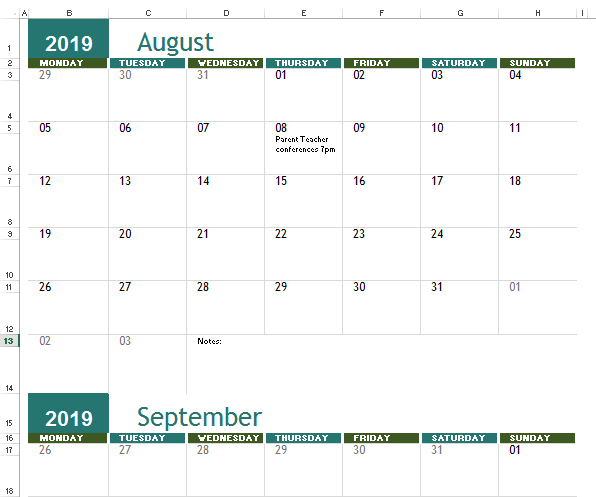
We may see a screenshot like the one below. We can see here that we can change the year and start using it for a different year than the one in which it was built, giving us the flexibility to use it whenever we want.
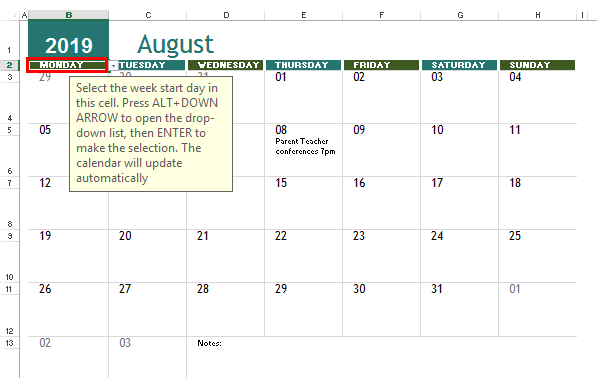
Here, we will must make another change: “select the week start day” for a month. The screenshot is below.
However, if we want to see a preview first and then decide if we wish to select that template or not, do a single click.
If satisfied, we must click the “Create” button to proceed with it. Otherwise, we need to close it by clicking on the “X” symbol in the dialog box and proceeding again. We can also move forward and backward to select the required one among the standard templates by clicking on the two symbols on the side of the dialog box (marked above in black).

Like this, in any template we choose, there will be some things we need to tweak to reuse for our purposes.
How To Create A Custom Excel Template?
Creating a Custom Excel Template will be like the way copies are done from the original piece. We take the utmost care in implementing the changes in the original work, making sure all the formatting, headers, placeholders, etc., are perfectly done. Please devote a sufficient amount of time here, as it will replicate anything and everything (for example, style, formatting, graphics, etc.) related to this workbook in its entirety.
#What changes can be saved when we create a custom template?
It can save anything we can do in a workbook in a template. Some of these include:
- Data Validation in Excel (selecting values from a list).
- Having a macro button.
- We can format some cells as we like (e.g., cells highlighted in yellow).
- Protect a range of cells from making any changes to it.
- Hide certain rows and columns, charts, images, excel hyperlinks, etc.
- Merge certain cells in excel or wrap excel text in some.
- Change the cell type to a specific format (e.g., date format in a cell)
- Freeze Excel cells so that header columns are always visible.
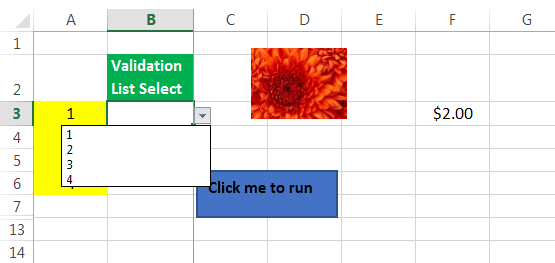
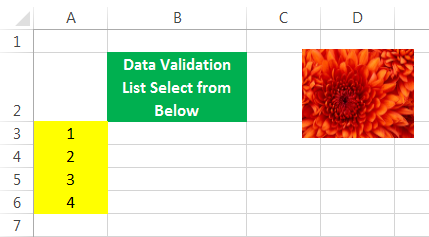
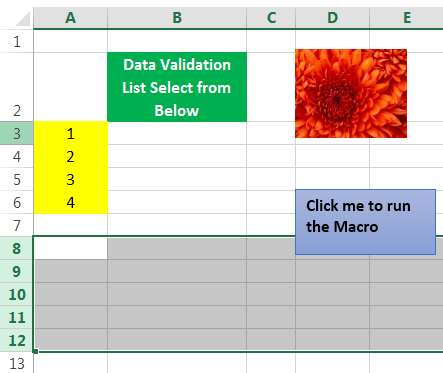
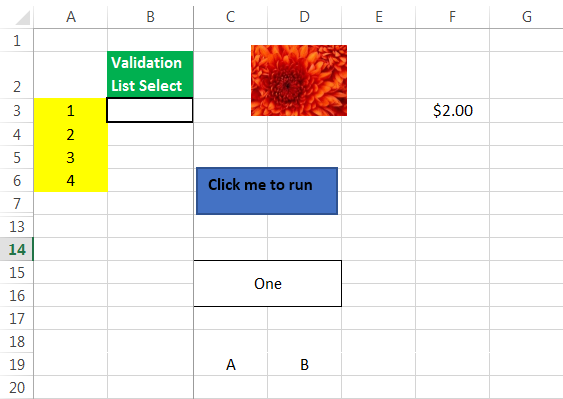
We have shown some of these examples in an Excel template we have created, in the image below.
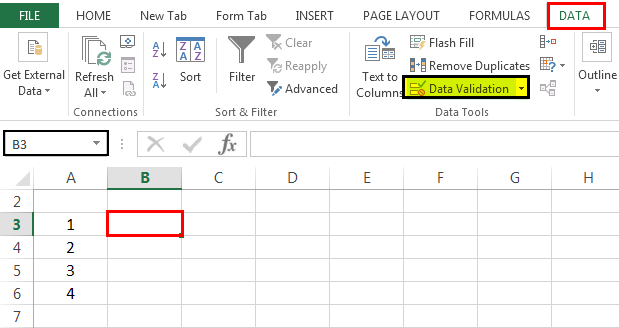
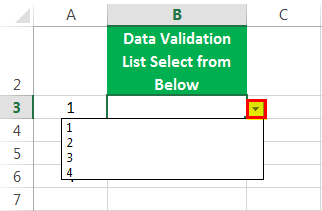
- Cell B3 will only take inputs from a pre-specified list. (Go to cell B3, then go to the “Data” tab. Select “Data Validation”).
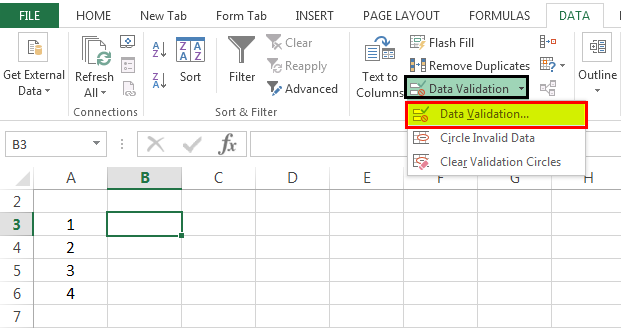
In the drop-down, we must select the first one, “Data Validation”.
- Then make the following changes as shown in the below screenshot.
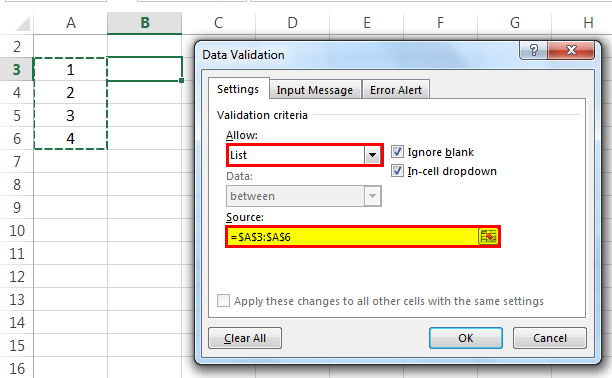
As a result, a drop-down list is created.
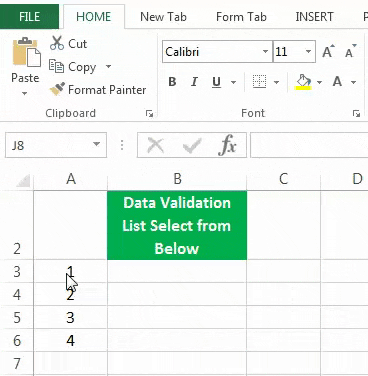
- Cells A3 to A6 will be highlighted in yellow. (We must select Cell “A3:A6”, go to the “Home” Tab, then click the “Fill Color”.)
- The image will be there at the place shown. (For this, we must go to the cell where we want to insert the picture, then go to the “Insert” tab, click on “Pictures,” and then upload the image where it is stored on our computer).
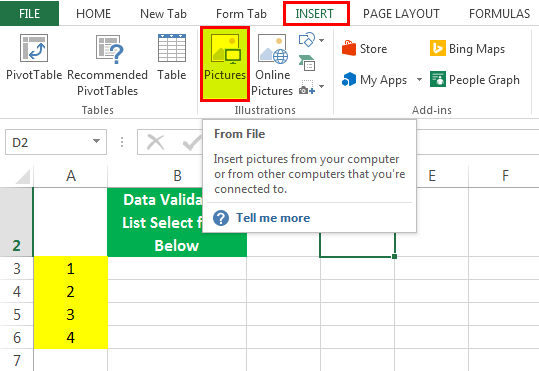
A picture is uploaded to that cell.
- A button is present, which will run the required macro on clicking. (We must go to the cell where we want to place the button, then go to the “Insert” tab, and go to “Shapes.”)
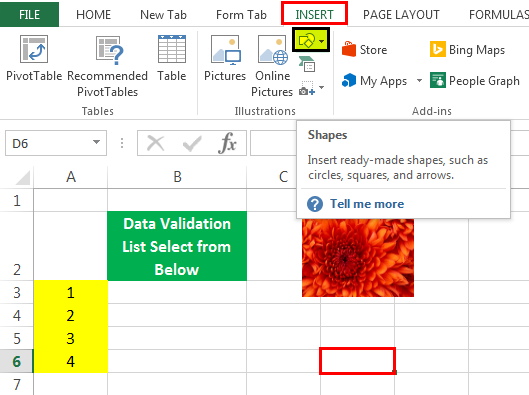
- Then, we must choose the “Shapes”. Right-click on it to select “Edit Text” if we want to write anything in it.
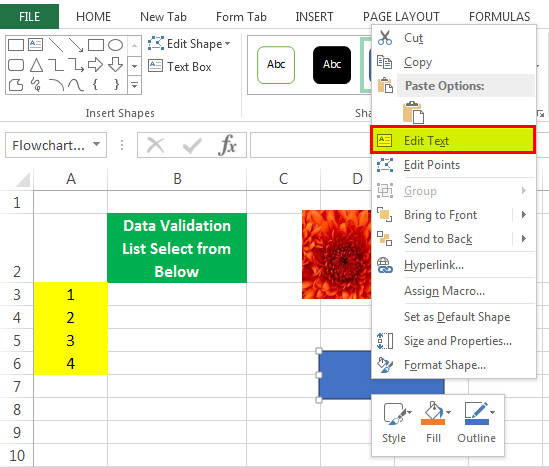
Then, we need to write, “Click me to run the Macro.”
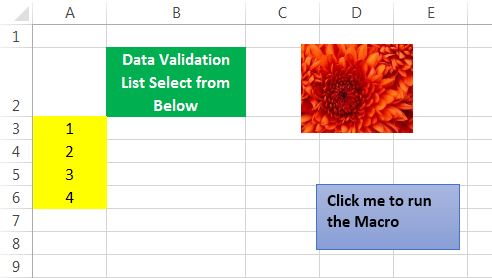
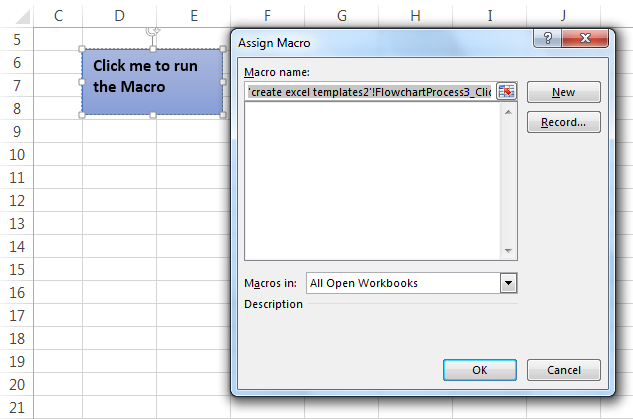
- Once done, right-click again and choose “Assign Macro.”
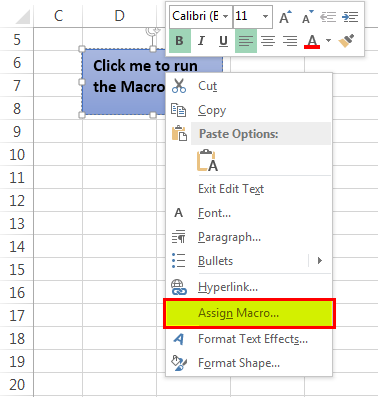
As a result, it will open a dialog box wherein we can assign the relevant macro we wrote in VBA.
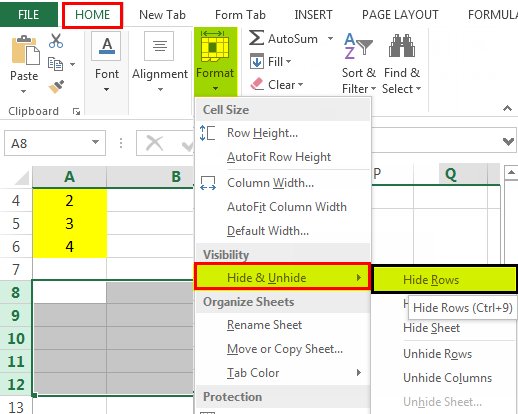
- Rows from 8 to 12 are hidden. (For this, we must, select rows 8 to 12).
Then, we need to go to the “Home” tab, then go to “Format,’” then to “Visibility,” then to “Hide & Unhide,” and then “Hide Rows.”
Similarly, in the above screenshot, apart from the ones mentioned above, we can see:
- Cell F2 will always be in currency format. (For this, we must go to cell J2, do “Ctrl+1,” then change the type to “Currency”).
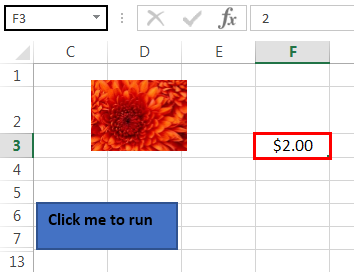
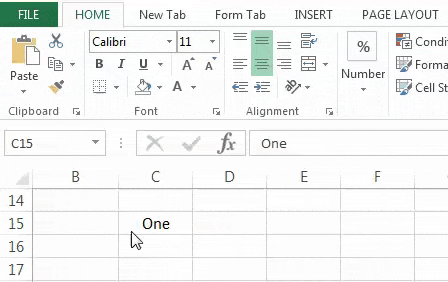
- Cells C15: D16 are merged into one. (For this, we need to select cell C15: D16 and then click on “Merge & Center in Excel“)
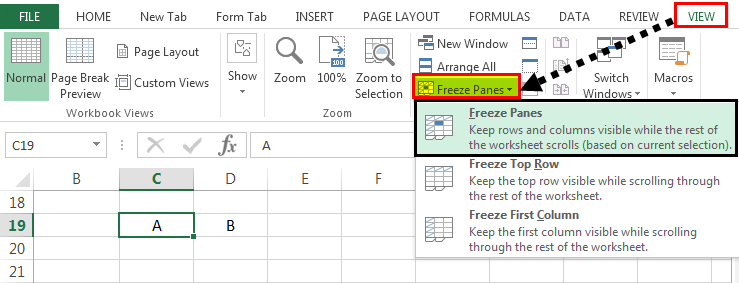
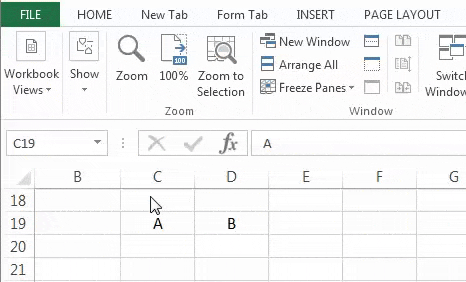
- A worksheet is freeze at cell C19 so that despite scrolling down, contents on row 19 will always be visible. We can use this when we always want to see the headers in our worksheet. (For this, we must go to cell N20, then go to the “View” tab and click on “Freeze Panes.”
The output is shown below.
Now, assuming we have done everything that needs to be done in our workbook, we will show the process that needs to be followed to save this created template and utilize it the next time.
How To Use The Created Excel Template?
Once we have created our templates and made the changes to the workbook or worksheet, we must click “Save As Type”,
- We must save it in the format “Excel Template” (*.xltx)’ if there is no macro.
- If a macro is present, we must use the format “Excel Macro-Enabled Template” (*.xltm).
The screenshot is shown below:
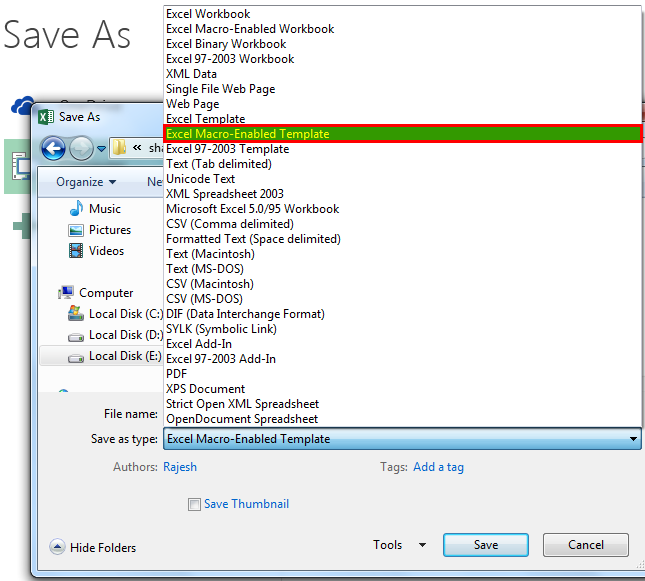
We saved it as ‘xltm’ since there was a macro present.
- Now that we have saved the created Excel template, we can utilize it like the way we showed when selecting a standard template. Now, we need to open an Excel workbook.
- Then, go to “File > New”.
We may see a similar screen in the below screenshot.
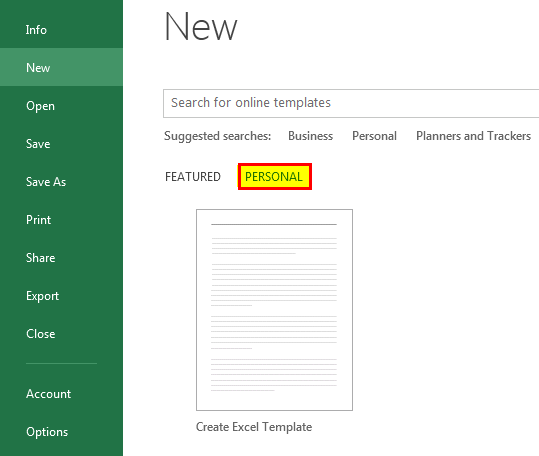
We can see a “PERSONAL” category adjacent to the “FEATURED” one. All our templates will be present here.
We will go to the “Personal” one and double-click the template “Personal” template (the name that we gave to our template). On clicking it, we may see a workbook with all the initial settings already present, which we do not need to do again.
We may see the screenshot below for reference.
Now, this is our created and saved template to use anytime.
Important Things To Note
- Depending on whether a macro is present or not in our template, save it accordingly. Save it as the “.xltm” file if the macro is present. Otherwise, we can save it in the “xlt” excel extension.
- The created Excel templates will be present in a different section called “PERSONAL,” apart from the already present ones in the “FEATURED” section.
Frequently Asked Questions (FAQs)
1. What are the uses of Create Templates in Excel?
The best uses of Create Templates in Excel are as follows:
• The automated and preformatted designs help organize the activities easily.
• It saves time and effort, and helps users to avoid memorizing the parameters every time.
2. Name a few templates that can be downloaded for free.
A few Excel templates that can be downloaded for free in a few of the Excel versions such as 2003, 2007, 2010, and 2013 are as follows:
• Billing Invoice Template.
• Seasonal Photo Calendar.
• Student Schedule.
• Weekly Attendance Report.
• Academic Calendar.
• Sales Invoice Tracker.
• Gantt Project Planner.
• Employee Absence Schedule.
• Billing Statement.
• Wedding Budget Tracker, etc.
3. Why are the Created Templates in Excel not working or found?
A few reasons the Created Templates in Excel may not work or be found are as follows:
• We may have entered the formulas for the entered values, and any modification in the calculation cell range will automatically reflect in the template. However, when we add/delete a row or a column, we must be careful because the formulas might not work. In such scenarios, we can make the formulas absolute or create a Dynamic table for the templates.
• We may have saved the template in a different name and forgotten it. We would have also saved it with an existing name, i.e., overwritten, and so the created template may have been replaced.
• We may have deleted the created template accidentally, and so it is not found. We must recreate it once again.
Recommended Articles
This article is a guide to Create Templates in Excel. Here we create-save, select-custom template for various purposes, examples & downloadable excel template. You may learn more about Excel from the following articles: –