IF Statement in Power BI
If you do not know logical functions, you cannot pursue a career as an analyst. Yes, this is TRUE. Without knowing logical functions, you cannot deal with a different set of calculations where the calculation requires you to test multiple logical tests in excel. The IF condition is the boss when it comes to logical tests. The IF statement is the boss, whether it is an Excel or Power BI anywhere. If you have already used the IF condition in Excel, it is the same as Power BI. This article will take you through how to apply logical IF statements in Power BI DAX formulas.

What is IF DAX Statements in Power BI?
The IF function is a logical function in both Excel and Power BI. So, it is used to arrive at results based on logical results. Logical results are in two ways: TRUE or FALSE. So, we can arrive at two results based on the result of the logical test. If the logical test is TRUE, one set of results or calculations. If the logical tests are FALSE second set or alternative to the first set of results.
Below is the syntax of the IF DAX statement in Power BI.

- Logical Test: For this, we need to apply what is the logical test to arrive at results.
- Result If True: If the logical test is TRUE, what should be the result.
- Result If False: If the logical test is FALSE, what should be the alternative result to the first one.
If you ignore the Result If False, then we will get BLANK as a result.
Examples of IF DAX Statement in Power BI
Below are examples of the IF statement in Power BI. You can download the workbook using the same file we used in this example.
Example #1
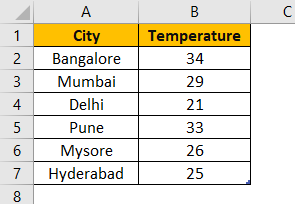
With this data, we need to arrive at a new column, i.e., “Status.”
To arrive at this new column, we have a certain criterion, i.e., “if the temperature is >25, then the status should be “High.” Else, the status should be “Medium.”
For example, look at the above data tables to apply the Power BI IF statement.
Copy the above table to the Power BI file.

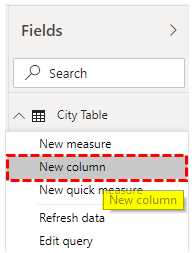
Right-click on the table and choose “New Column”.

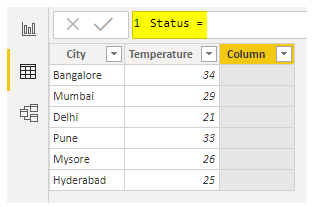
First, give a name to this new column as “Status”.

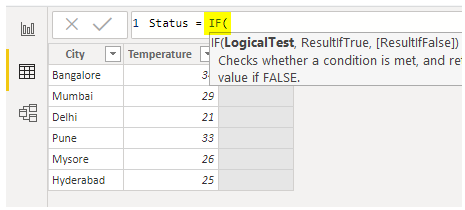
Open IF DAX Statement now.

The logical test is to check whether the temperature is >25 or not, so first select the temperature column and then apply the logical test as shown below.

Once the logical test is applied, we need to mention what the result should be if the logical test is TRUE.So our result if the logical tests are TRUE, i.e., If the temperature is >25, then we need the result as “High,” mentioning the result in double-quotes.

If the result is FALSE, then we need the result as “Low.”

Close the bracket and press the “Enter” key to get the result column.


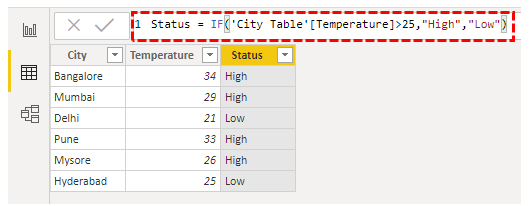
We have a new result column with a logical IF formula.
Example #2
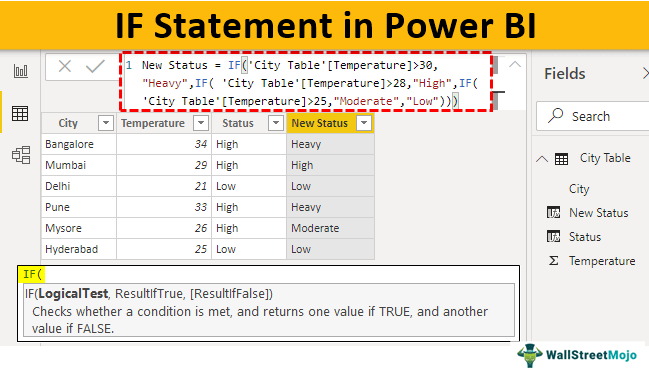
Now, assume that instead of only two sets of results, we need to arrive at multiple results based on multiple logical tests.
For example:
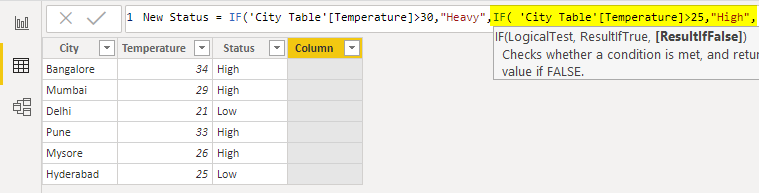
- If the temperature is >30, the status is “Heavy.”
- If the temperature is >28, the status is “High.”
- If the temperature is >25, the status is “Moderate.”
- If the temperature is <=25, then we need the status as “Low.”
Here we need to test 4 different logical tests, so this requires nested IF conditions to be applied.
- Open the IF condition and apply the first logical test.
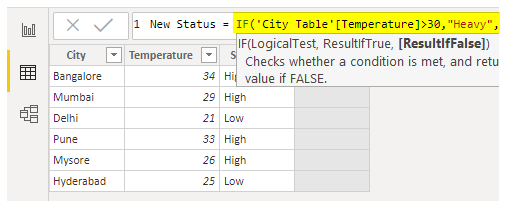
- The first logical condition is applied. Now, we need to test other logical tests if this is FALSE, so since we need to test other logical tests, open one more IF condition.
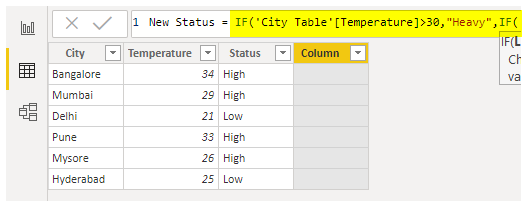
- This IF condition applies a second logical test and arrives at the result if this logical test is TRUE.
- Similarly, IF both these logical tests are FALSE, we need to do another logical test, so open another IF condition.
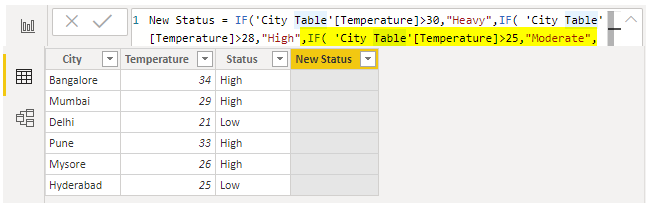
- Like this, we have to do one more logical test if all these three logical tests are FALSE. But, instead of opening one more IF condition, we can use the last argument, i.e., “ResultIfFalse.” We can employ this argument if all the applied logical tests are FALSE. So, if all these are FALSE, then we need the result as “Low.”
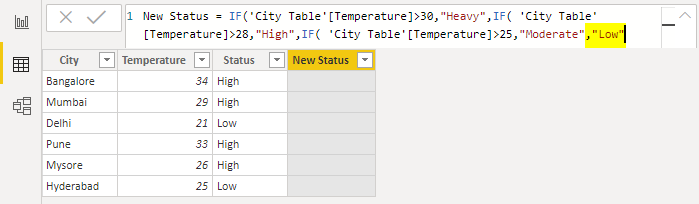
- Now, close brackets as many IF conditions open. After closing the bracket, press the “Enter” key to get the new status result.

Here, we have the results. Like this, we can use the IF DAX function to get the conditional calculation column.
Note: We can also download Power BI IF statement file from the link below and view the final output.
Things to Remember here
- The IF DAX function is the same as Excel IF logical function. Therefore, all the arguments and application methods are the same.
- In the case of multiple conditions, we need to use AND and OR logical functions to arrive at a single result.
- The AND logical function is represented by the double ampersand (&&), and OR logical function is represented by double straight lines (||).
Recommended Articles
This article has been a guide to Power BI IF Statement. Here we discuss how to apply the IF function in Power BI Dax formulas with the help of examples. You can learn more from the following Power BI articles: –