Security in Power BI
Data security is the most important aspect when we share data with others. They could be external clients or internal stakeholders. Often, we do not want to share all the data with everybody. For example, when sharing the file with regional managers, what is the point of sharing other regions’ sales data with the “South Zone” manager. So, with this regard, we can create security access in Power BI while sharing the report.
This article will take you through building row-level security access in Power BI.
Row Level Security
Data is stored in rows and columns. So, when we want to share the data with a larger group, all of them do not want to see all the rows of data. Therefore, we can create “row-level security” in Power BI to enable a specific person to see only a specific data set.
For example, a sales manager of India needs to view only the “India” region sales numbers, and the overall business head can see all the region’s data. So, this is the kind of security we need to create before sharing the data, called “Row-Level Security.”
Create Row Level Security in Power BI
To create row-level security, we need to have some data. We have already created a simple chart in Power BI.
You can download the workbook to use the same file as we used in this example.
Below is the chart created in Power BI to show the product-wise sales chart.
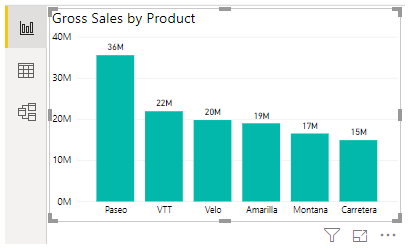
At this moment, overall, all the countries’ sales are based on different products. So, we need to create row-level security to show only specific country sales based on products. Hence, below are the countries we have on this list.
Canada, France, Germany, Mexico, and the United States of America.
Follow the below steps.
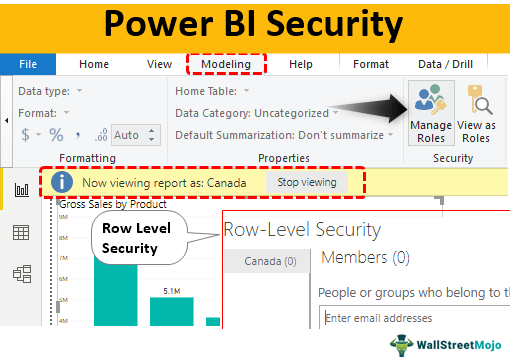
Under the “Modeling” tab, click on “Manage Roles.”

It will open the “Manage roles” window like the one below.

Click on the “Create” option to create the first country role.

Give a name to this role. For example, since creating the first country security, give the name “Canada.”

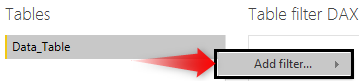
Next, we have the table name “Data Table.” Click on the ellipsis (three dots). It will show the “Add filter” option.

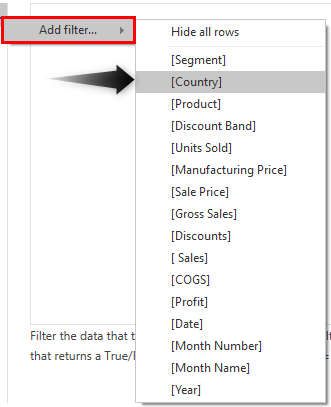
Hovering on “Add filter” will open up all the columns in the table. Since we are applying country-wise row-level security, choose the “Country” column option.

Using the DAX expression, we need to create a role here. Enter the country name in double quotes. Click on “Save” to close the “Manage roles” window.

Now, we have created row-level security for the country “Canada.”
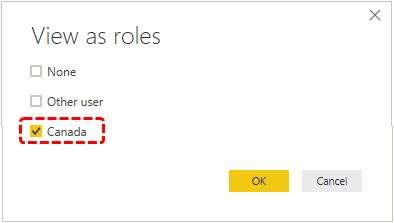
Under the “Modeling” tab next to the option of “Manage roles,” we have an option called “View as Roles” click on this.

It will open up the roles list that we have created..Choose the role “Canada” and click on “OK.”

Now, we can only see the “Canada” country sales chart.


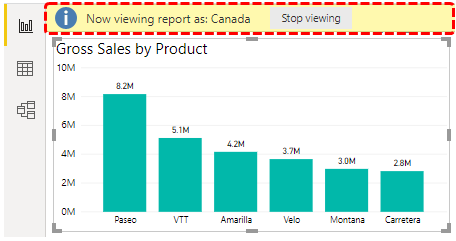
As you can see at the top of the chart, it shows “Now viewing the report as Canada.” We can click the “Stop viewing” option to return to the older chart.
Like this, we can create roles for other countries as well.
We need to assign the email IDs to share the report in Power BI services.
Configure Power BI Services
- Publish the report to Power BI Services by clicking on the “Publish” option in Power BI Desktop.

- Now, log in to the Power BI Services account. In the Power BI services account, it will be published in “My workspace.”

- Click on three dots in front of the published article under “Datasets.”

- Choose the “Security” option.

- It will show a row-level security option for you. Enter the email address of the respective sales manager here and click on the “Add” option.

Now, save it. Like this, we can create row-level security in Power BI.
Note: We can also download the Power BI dashboard file from the link below and view the final output.
Things to Remember
- Once the row-level security is created in Desktop, we must publish the report to Power BI Services. We must have a paid version to share the report with the concerned person.
- We can view only filtered data from the concerned person.
Recommended Articles
This article is a guide to Power BI Security. Here, we use an example to discuss how to build row-level security access while sharing Power BI reports. You can learn more from the following articles: –